


4 Primary Use Cases of the Calendar Invite Server on AWS SES
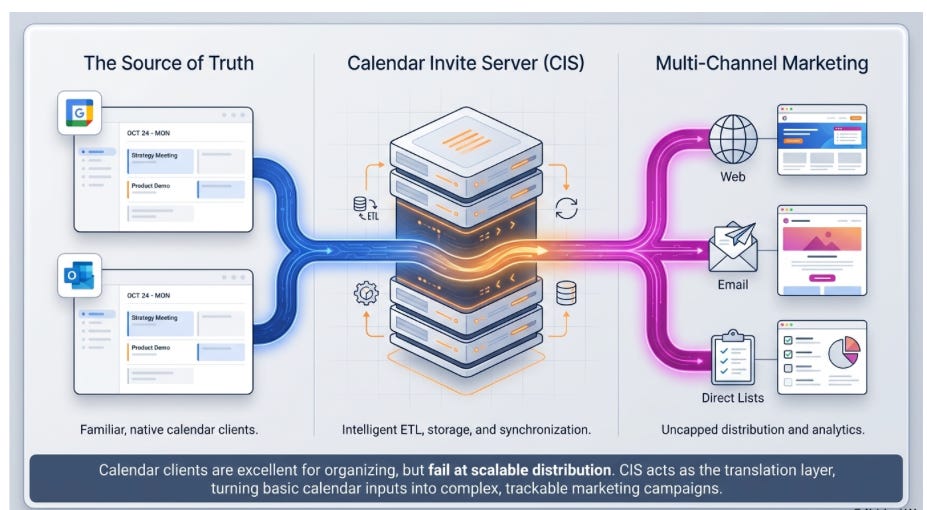
The Calendar Invite Server automates the ingestion, sending, tracking, and updating of calendar invites for Humans and AI Agents across various use cases, using AWS Functions and the AWS SES messaging pipeline.
It ships as a CloudFormation template, auto-installs in your AWS SES account, and supports 11 APIs built for Developers, enabling 100s of use cases for AI and APP integration that can be programmed with the Messaging Pipeline’s 30 Lambda functions built in Python.
1. Embedded Events on schedule pages with Calendar Invite Buttons
In sports schedules, concert schedules, etc., the event pages are auto-generated directly from .iCAL ingest data and are ready in seconds for thousands of events.
The generated schedule page can be used as a standard scheduling app, allowing customers to enter an email address and select calendar invites to send with a single button click, or be used in an AI NLP search via an AI prompt to send calendar invites with a query by the human of the schedules, with an insertion of the email and a one-click in the NLP to get the calendar invite sent.
How- Visitors pick a time slot and receive an automated calendar invite upon booking; calendar receipts are collected, and updates for merch and tickets are automated.
2. Email CTA buttons (MailChimp, etc.)
How - A ”Send Calendar Invite” or “Register Now” button is embedded in a marketing email. When the customer clicks the CTA, a calendar invite is sent.
3. Upload batch email list (browser)
How - An Event is selected from a list. A CSV email list is uploaded through a browser-based tool. The system parses recipient data, sends bulk calendar invites to all entries in the list for that event, and tracks the data, which can be updated.
4. Systems of record (CRM / ATS / ERP direct API)
How- Calendar invites are triggered automatically from a system of record (CRM, ATS, ERP) based on workflow rules or status changes — e.g., a deal advancing to “Demo Scheduled” fires an invite to all participants or Billing systems for invoices.
Level 1 Human-in-the-Loop automation - Create Calendar Invite Event with CRUD workflows that can be run from Outlook or Google Calendar Clients with a human-in-the-loop and AI workspace agents to automate use cases for the Calendar Invite Server Pipeline.
Level 2 No Human in the Loop automation- When AI agents are operating per Calendar Invite Server Functions and assigned an email address, they can send calendar invites for transactional and marketing use cases for billing systems and sports schedules, where an agent can chat with a human and create calendar invites on the fly, sending them a personalized calendar invite to their email in milliseconds and collect the calendar receipts and updating the calendar invites based on Lambda functions in the calendar inivte server.
The Calendar Invite Server Shipping User Interface Review
Update June 19th, 2026 - Getting Ready for AWS Marketplace
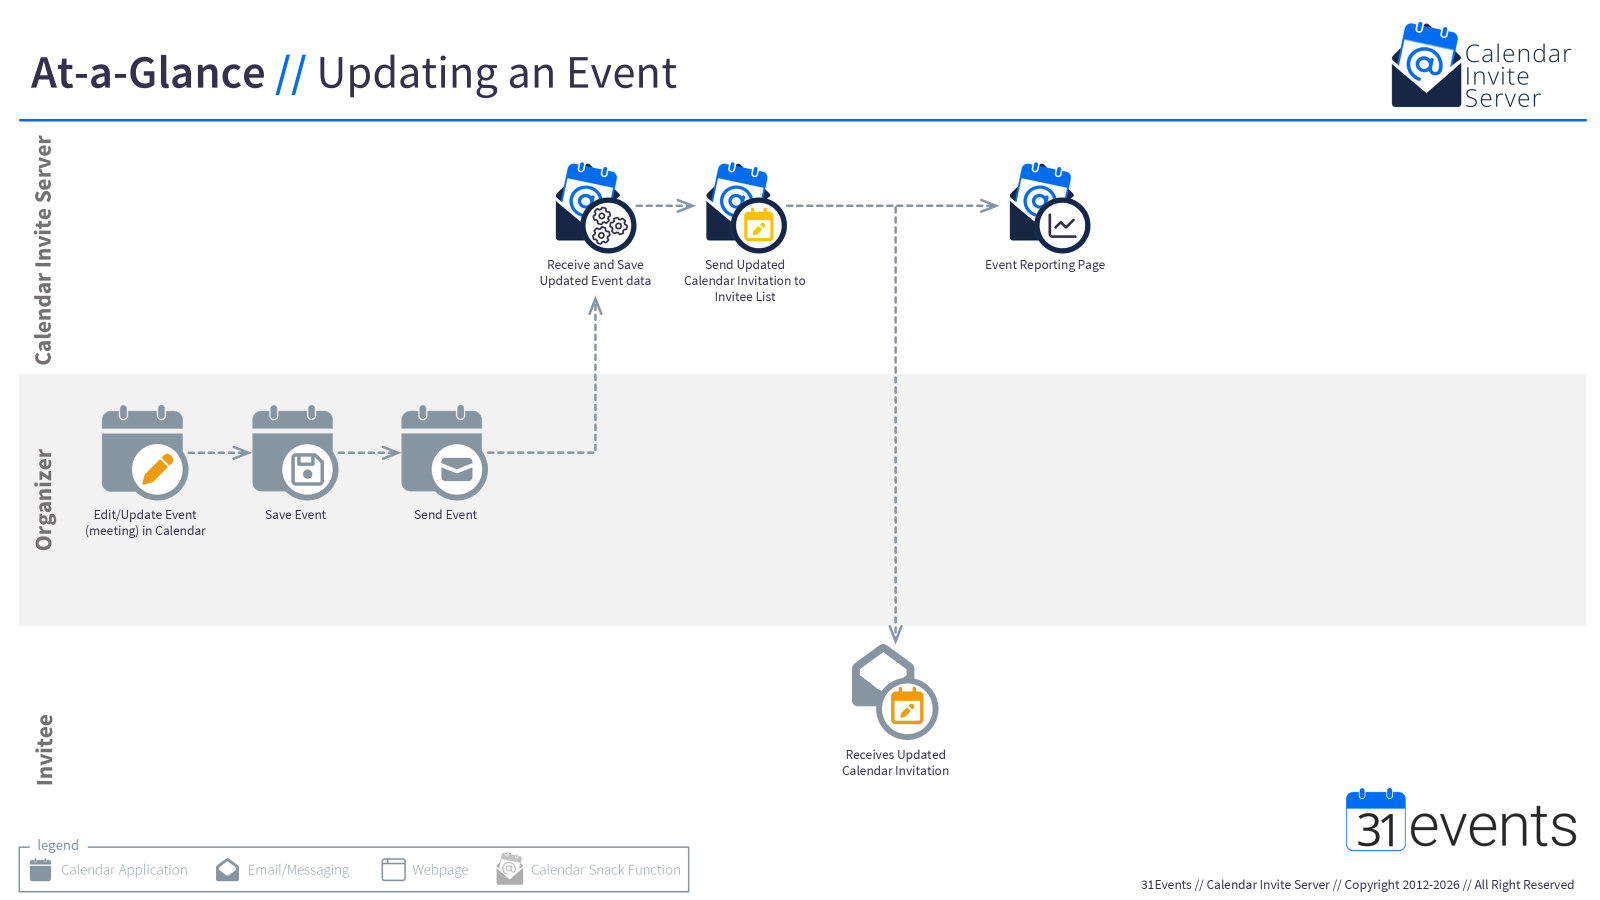
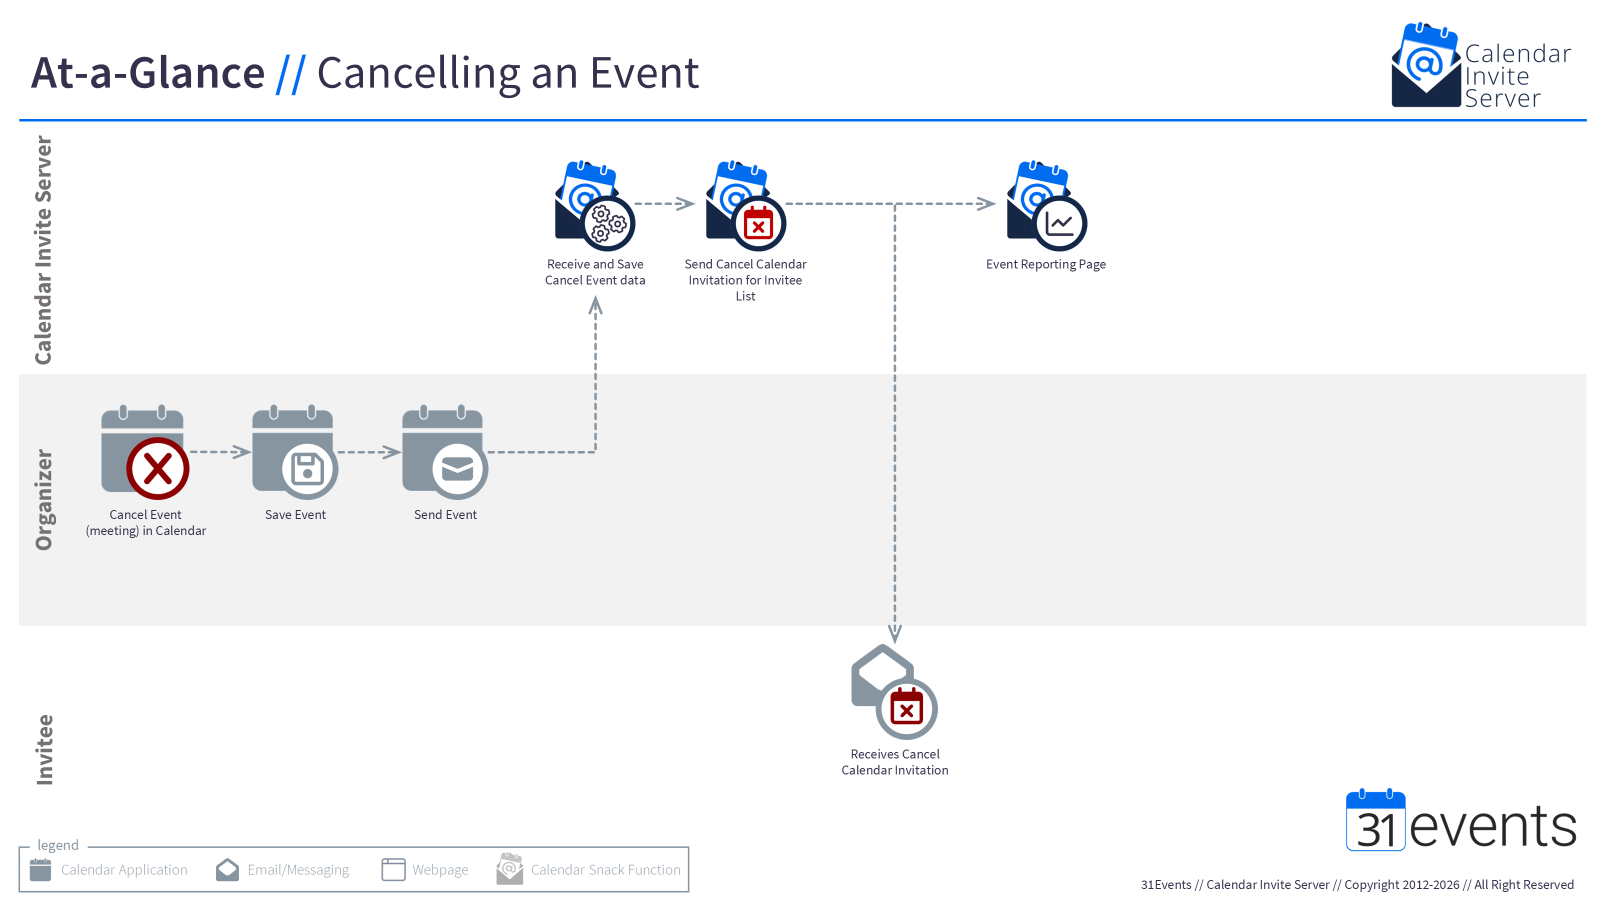
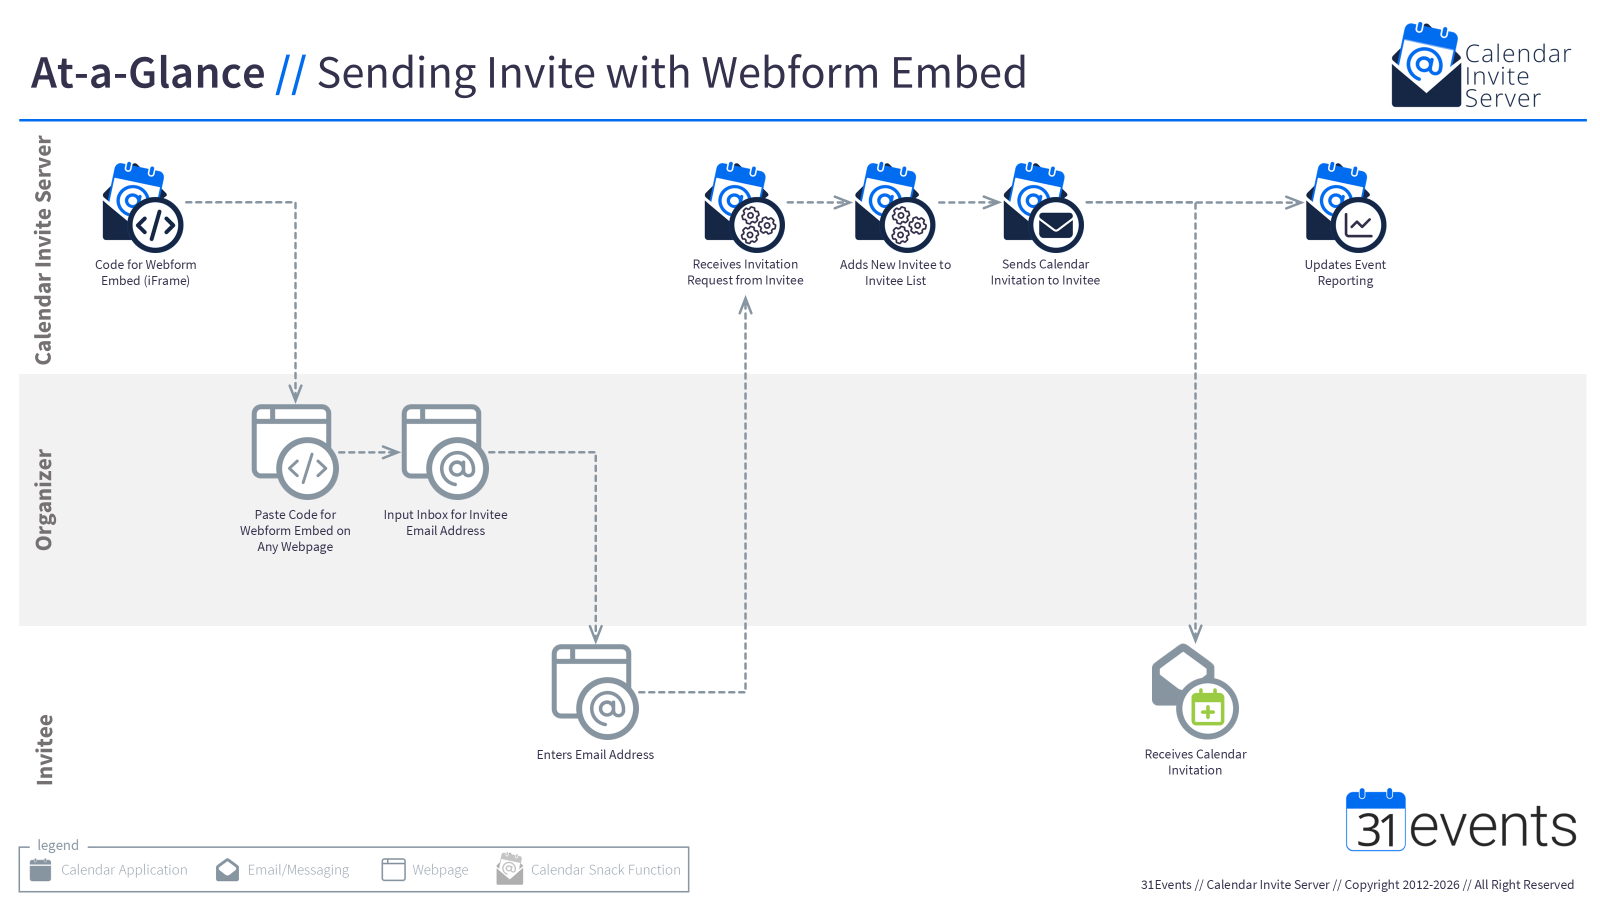
The Organizer creates, updates, and deletes Event Data on the Calendar Invite Server using their calendar client. The organizer can then select Sending Calendar Invites from Web Pages, Schedule Pages, Email Marketing Vendors, and Direct Lists in the web interface.
Use Case 1 – MLB Schedules
Walking through a Sports Campaign for the Organizer and a customer and picking up how the Display and Action API’s work.
The Inbound Processor
The Calendar Client uses the CRUD commands to communicate with the Calendar Invite Server to create, read, update, and cancel data, using the EDIT and SAVE commands.

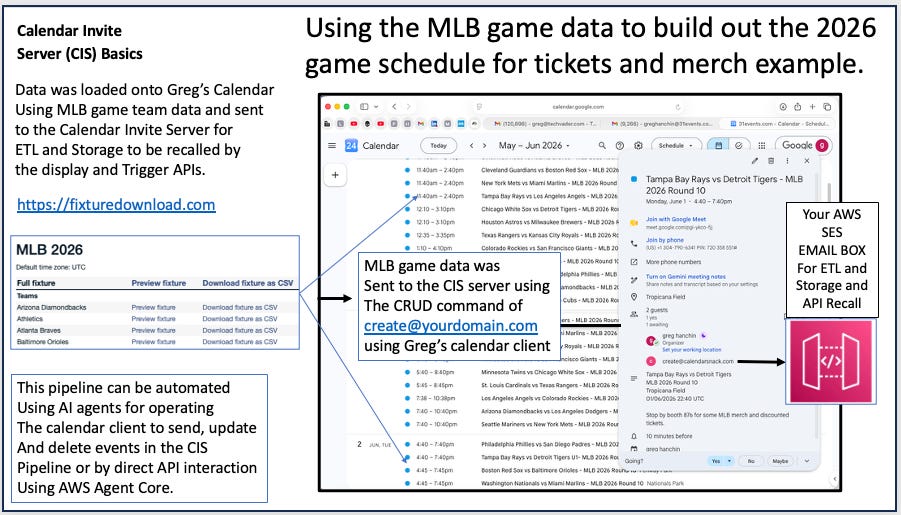
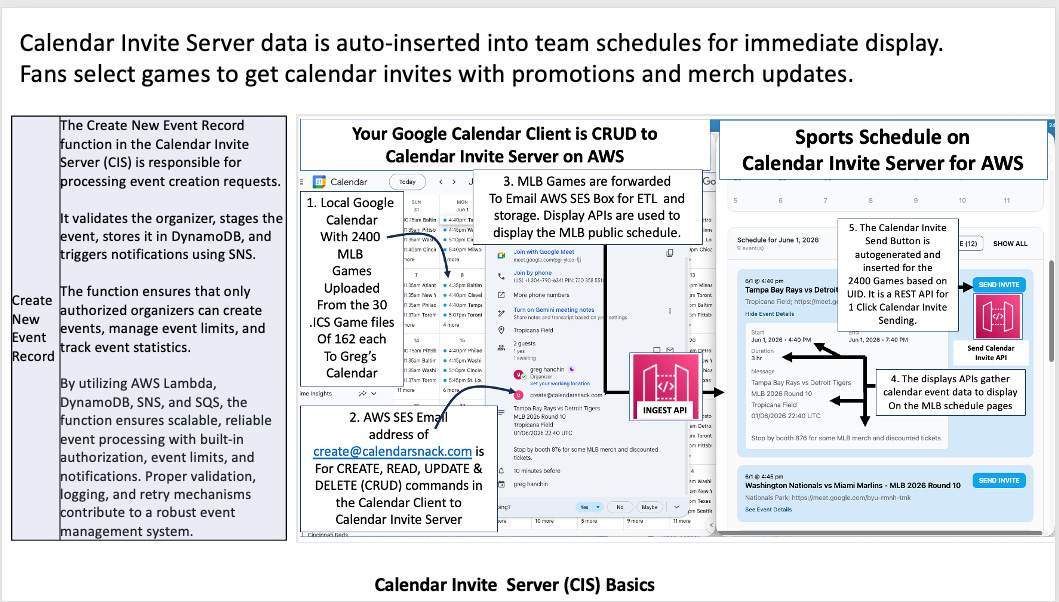
Background for MLB Schedule on AWS demo.
Step 1.
greghanchin@31events.com is the organizer for the MLB schedule. He is using his calendar client to communicate with the calendar invite server and inject data into his Organizer account to build out the MLB 2500 game schedule, so he can promote them individually for merch and ticket offers that will be sent via the calendar invite server’s automatically built MLB schedule site. Greg uses the native functions of Google Calendar or the Outlook Calendar Client to organize the games and update the data as needed. Those Edits and Saves are reflected in the DISPLAY APIs that drive the Schedule pages shared with his customers.
CREATE@YOURDOMAIN.COM is the single Command for ETL, storage, and display APIs for calendar invite event data using the Inbound processor functions. He sends the 2500 Calendar Invites for the games from his calendar client using automation, via the create@yourdomain.com SES email box on your calendar invite server. His calendar client is the source of truth for his game schedule, enabling him to run promotions and merch offers using the UPDATE function.

INBOUND PROCESSOR details.
Steps 2 & 3.
The calendar invite from Greg’s calendar client is copied to an AWS Simple Email Service (SES) mailbox by the organizer’s calendar client for ETL, storage and retrieval. In this demo, the box is create@calendarsnack.com for the CRUD pipeline on AWS. The calendar invite event data is disassembled and stored as a “NEW” Event in the DB, with a UID assigned to the organizer’s calendar client email address. This attaches the organizer’s Email Address and event UID to the Calendar Invite Server Pipeline database, enabling the Organizer’s Calendar Client to update or cancel the data as needed. This creates a sticky UID for programmatic access.
Updates using the organizer’s calendar client, such as “Edit and Save,” can be made an unlimited number of times before the event time expires in this workflow. Examples include changes to date, time, location, or message body. Or for promotional offers in the subject line, message body, or secret location.
Every time an edit and save are performed in the organizer’s Calendar Client for that event, the data is sent to the Calendar Invite Server’s Email Box for processing and database storage as an update. Cancel abides by the same workflow and can only be completed once. That data is not deleted from the database; it is marked as canceled. (May 1, 2026V)
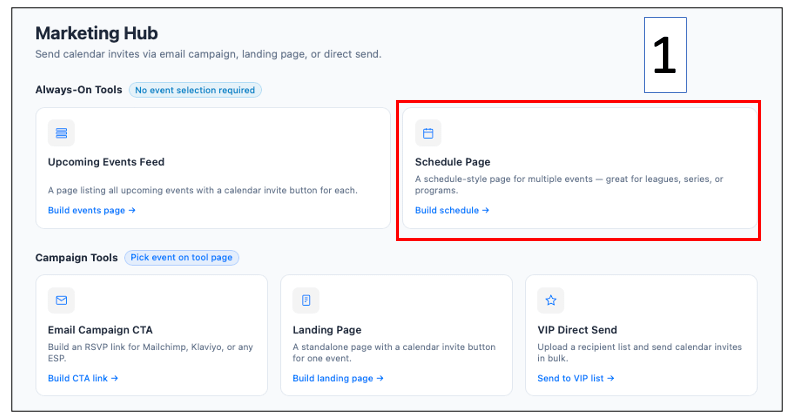
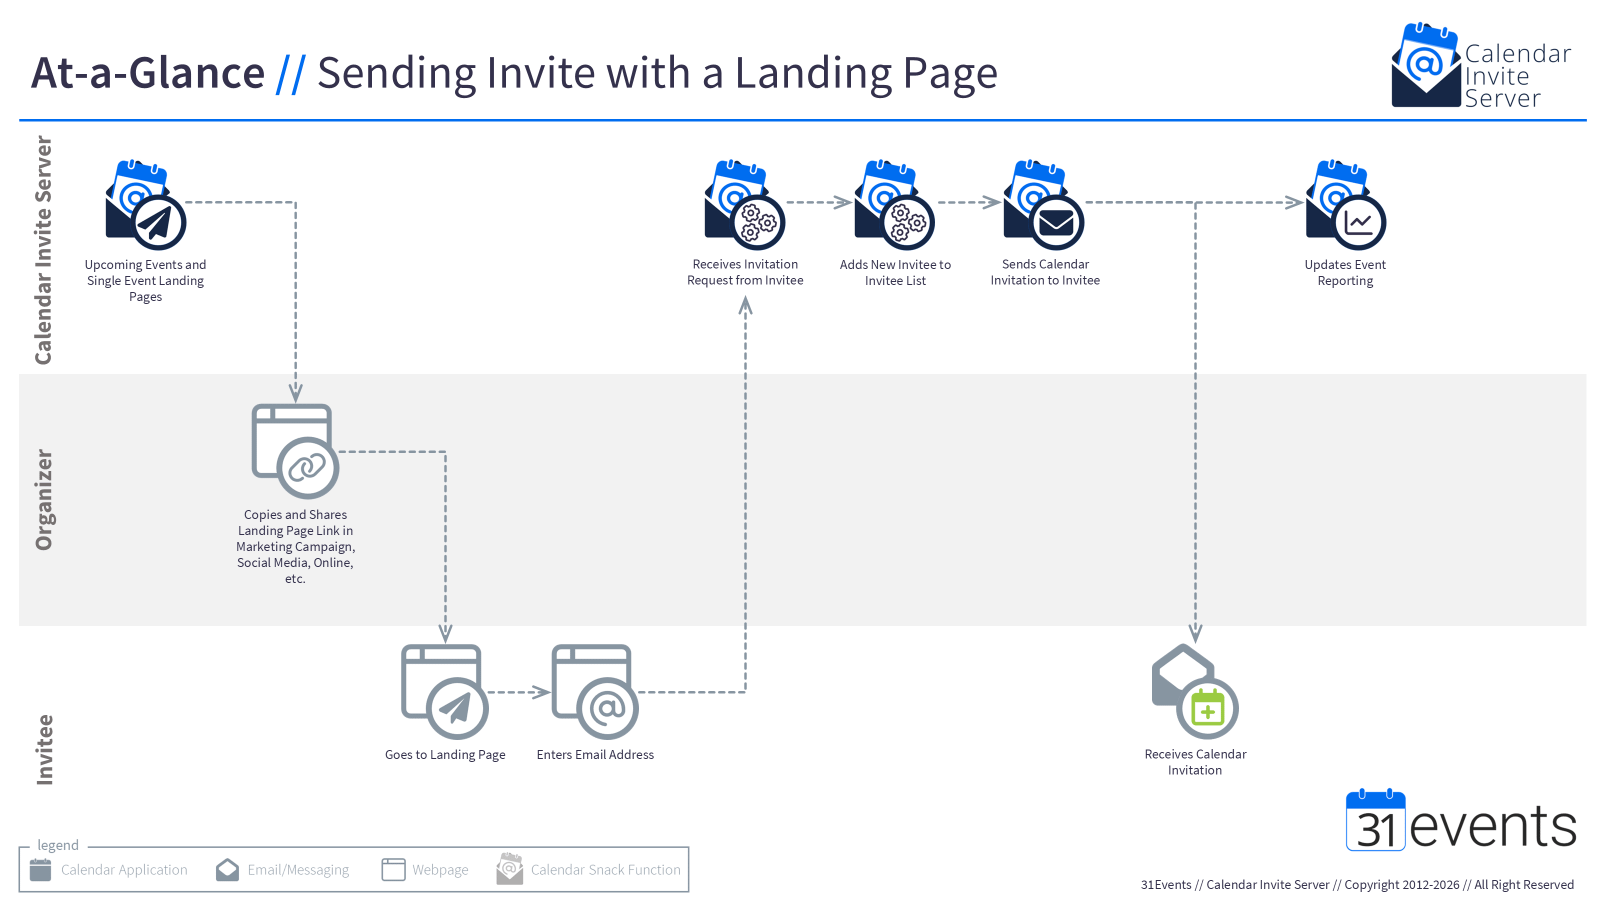
How to configure a Schedule Page using the Marketing Hub for the MLB demo.

Configuring the Schedule Page
Steps 4, 5, and 6.
Select Schedule Page, Search by Organizer Email Address, Month and Color Layout, and add your Logo URL and Background image (Optional). You can also select a time sequence for displaying the data, which I did not do. This task completes the configuration operations for the MLB page.
Generating and sharing the auto-generated MLB schedule page
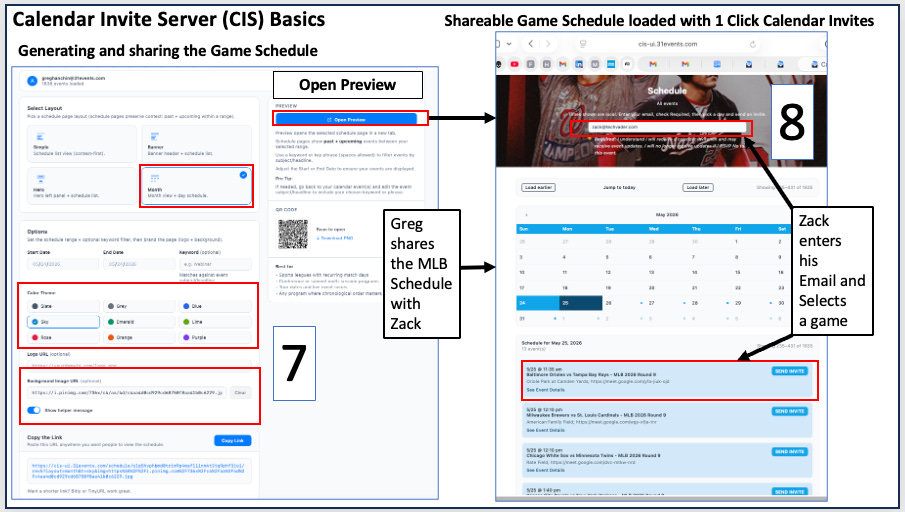
Steps 7&8.
Step 7: Open Preview. Generates a page URL.
You can place it in a URL shortener like TinyURL before sharing (or not).
Step 8:
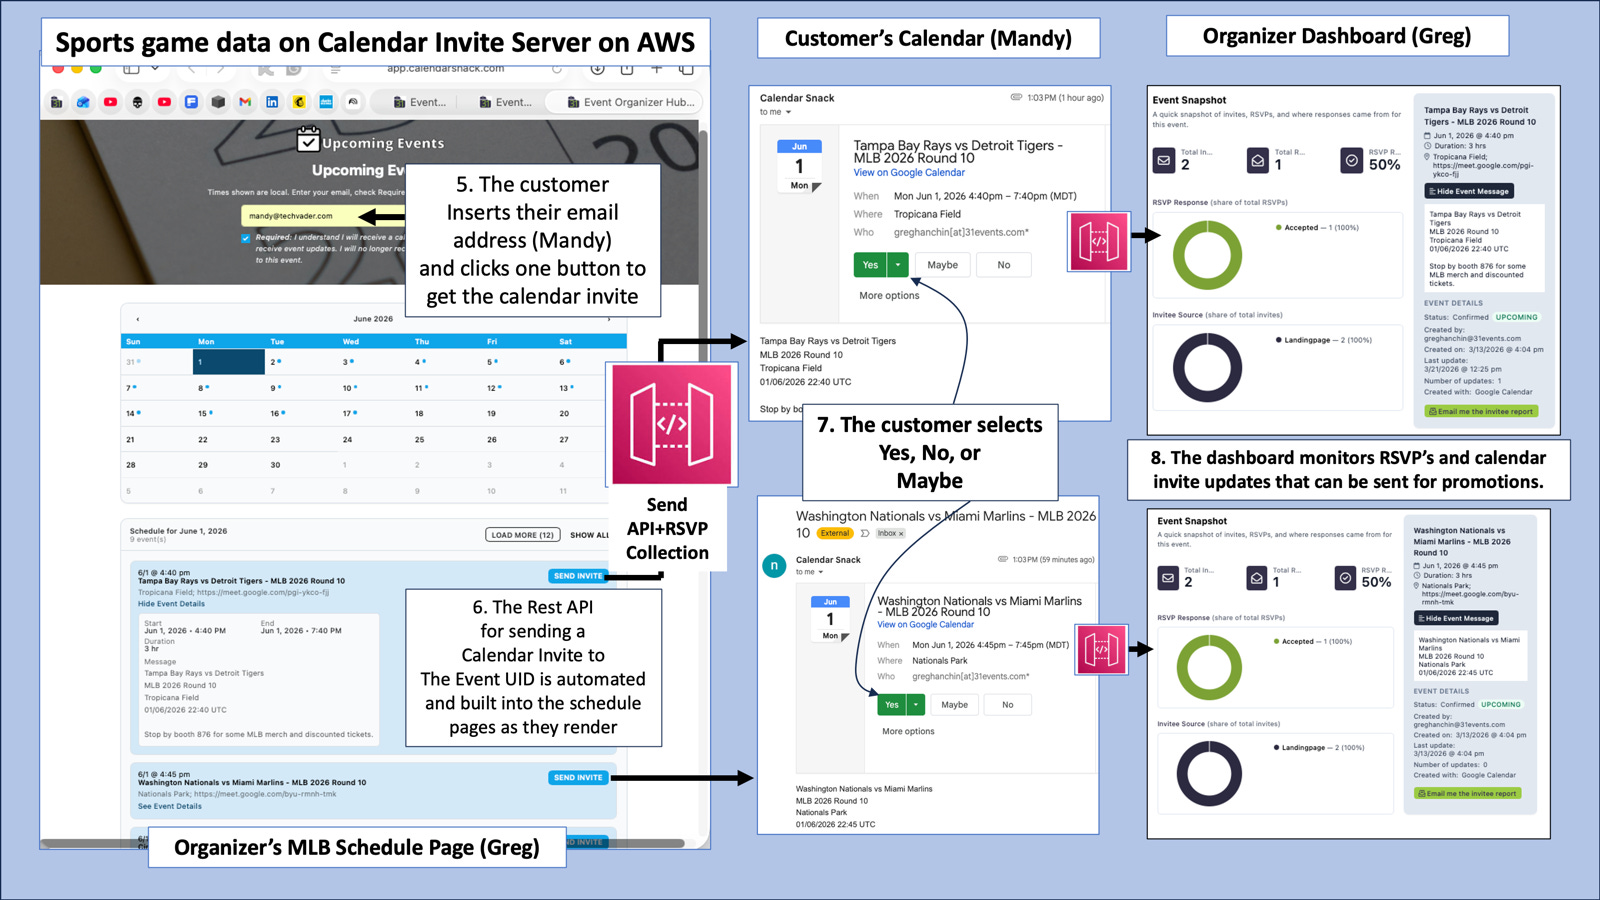
Zack, the customer, enters his email address in the email field at the top, selects games, and clicks Send Invite.
Outbound Processor Workflow

Steps 8&9.
Step 8
Zack, the customer, enters his email address in the email field at the top, selects games, and clicks Send Invite.
Step 9
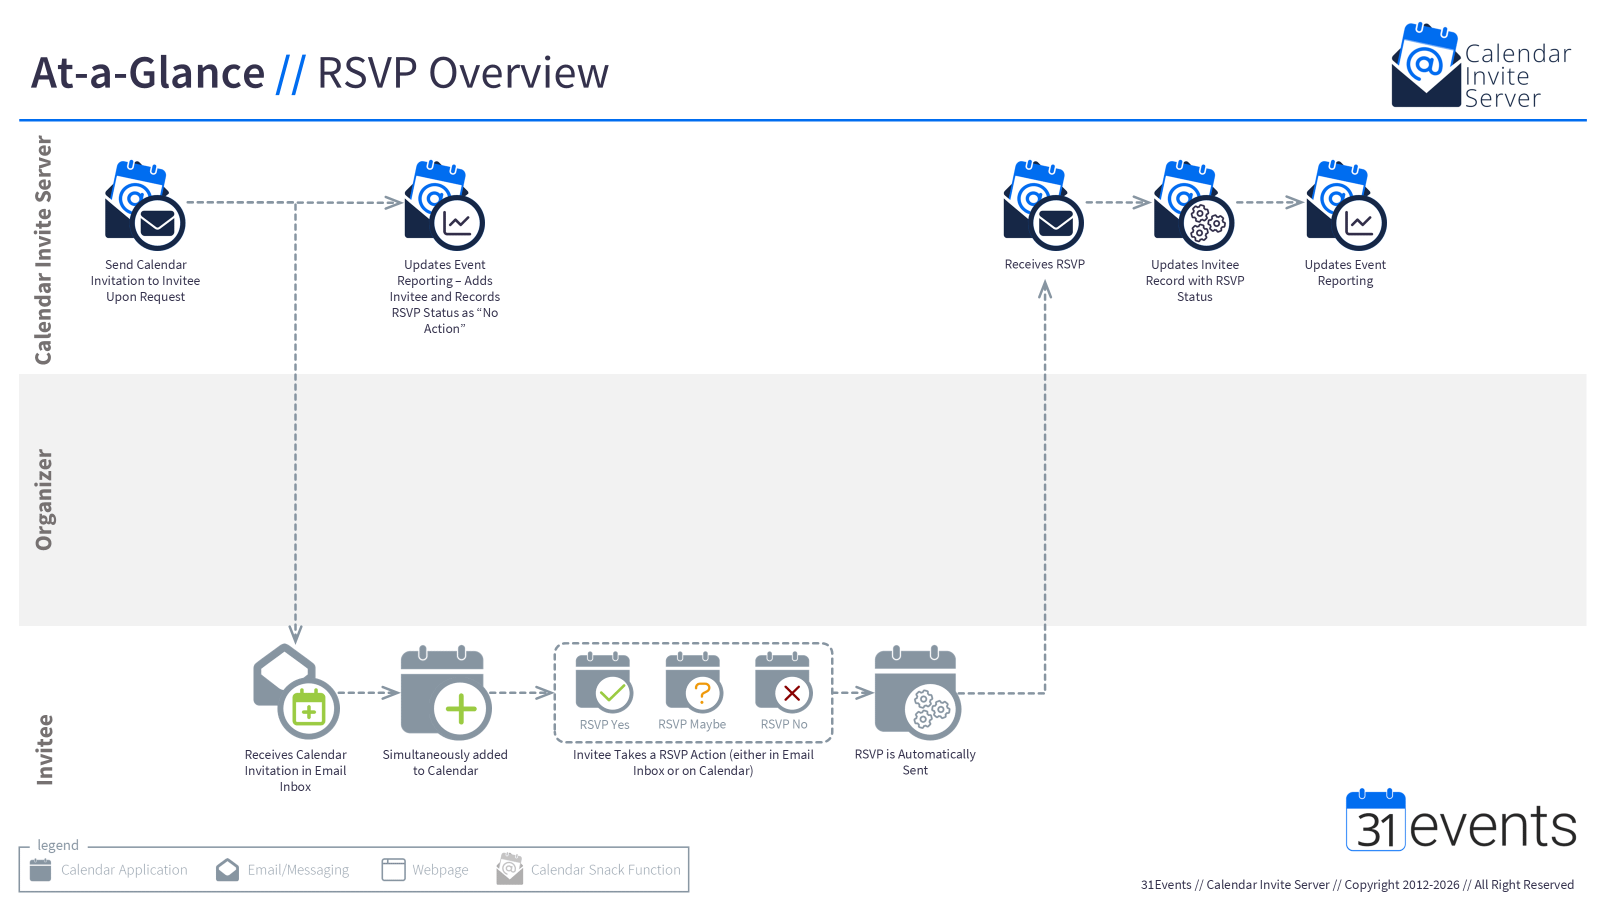
Zack receives the calendar invite that he sent to himself and decides what status he wants to respond to Y, N, or M.
The calendar invite message body or location can be used for creative promotions and updates to notify the customer. If they do say Y or M, they will receive UPDATED messages in the Calendar Invite to encourage them to attend the event, the booth, or the webinar.
Outbound Processor Details
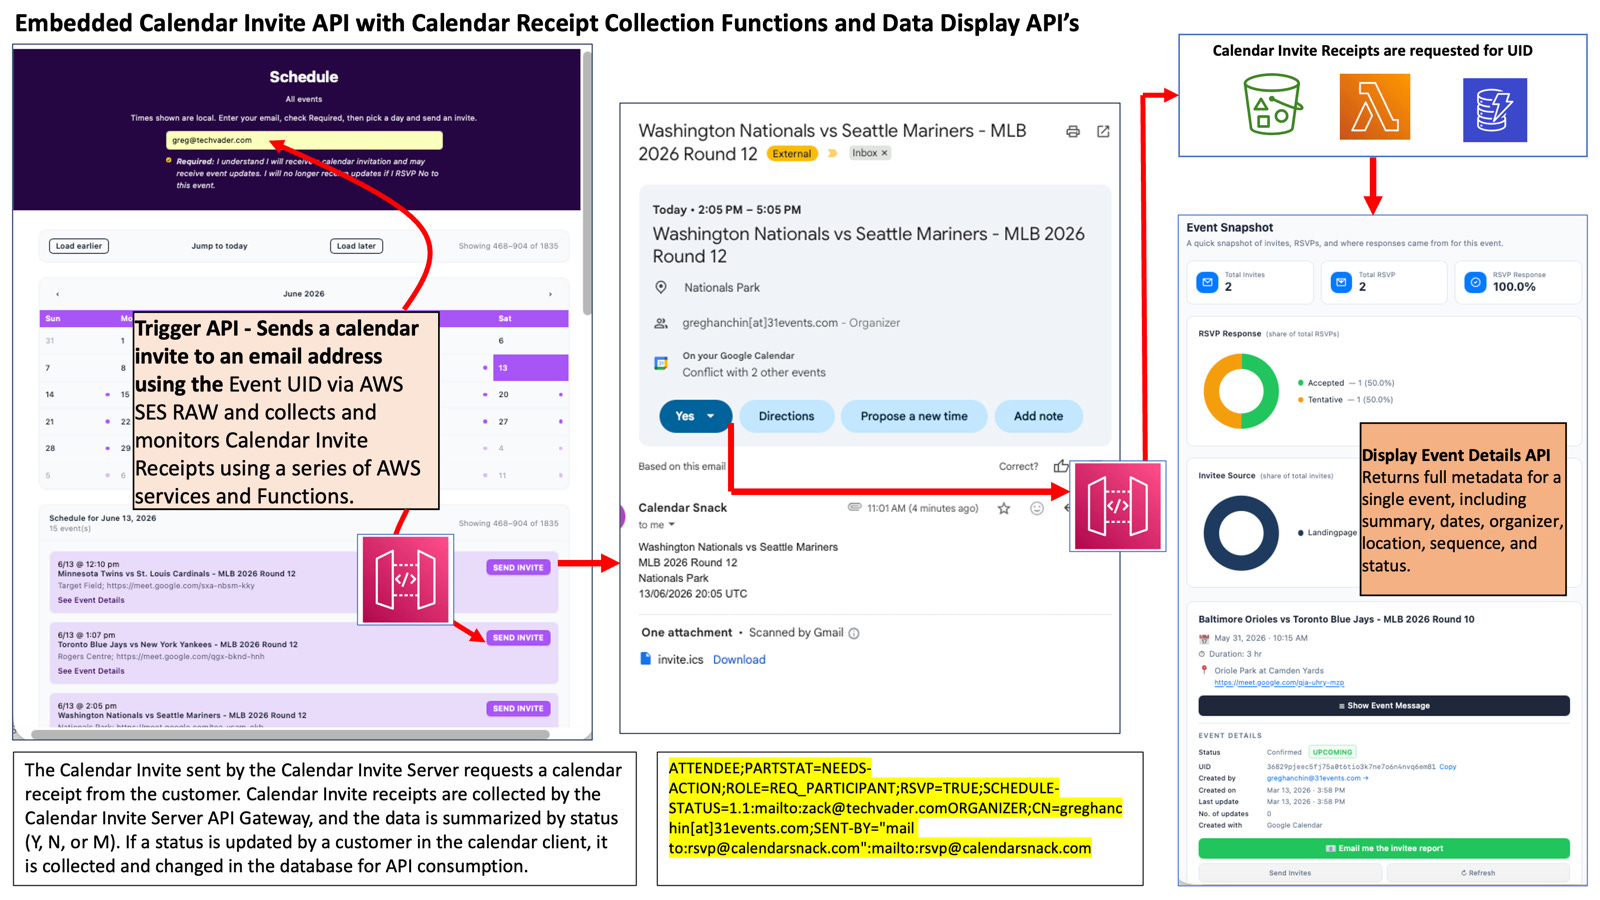
The stored Calendar Invite data is called using the Calendar Invite Send REST API Endpoint. This API is used to send Calendar Invites for RSVP Buttons, like Mailchimp, to embed the Calendar Invite into Sports Schedule Web Pages, or to embed the API into a GUI Picker for selecting and sending Calendar Invites to an email List. In all cases, the API matches the Email from to the stored Event UID, reassembles the calendar invite data from DynamoDB using ETL functions, and sends the package via AWS SES RAW. The calendar receipt is requested, retrieved from the customer’s calendar client, and sent back to the API gateway, where it is stored in S3 and then ingested into DynamoDB for Analytics and decision-making. Anytime the customer changes the data on the calendar client, it is sent back and updated.
Getting detailed data about a particular event
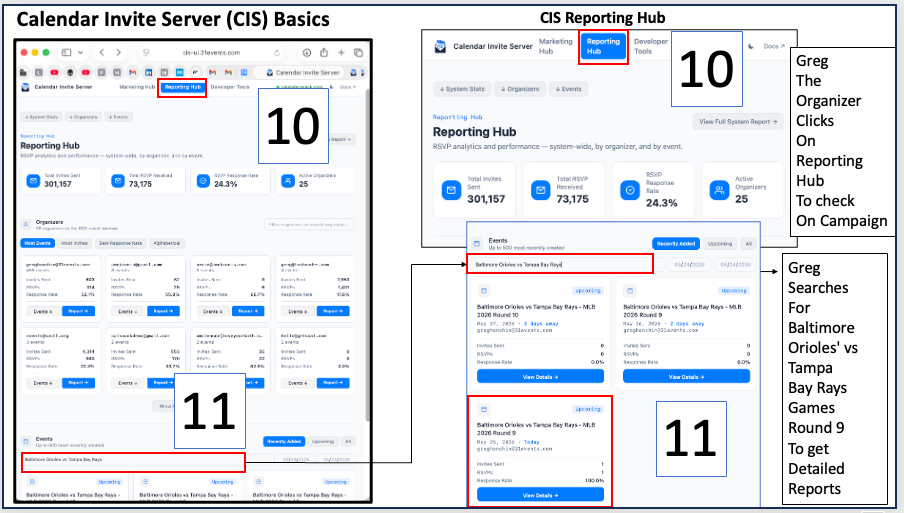
Steps 10&11.
Step 10. Greg, the organizer, clicks the Reporting Hub to check on the Round 9 campaign. He enters “Baltimore vs Tampa Round 9” in the search bar to see event details.
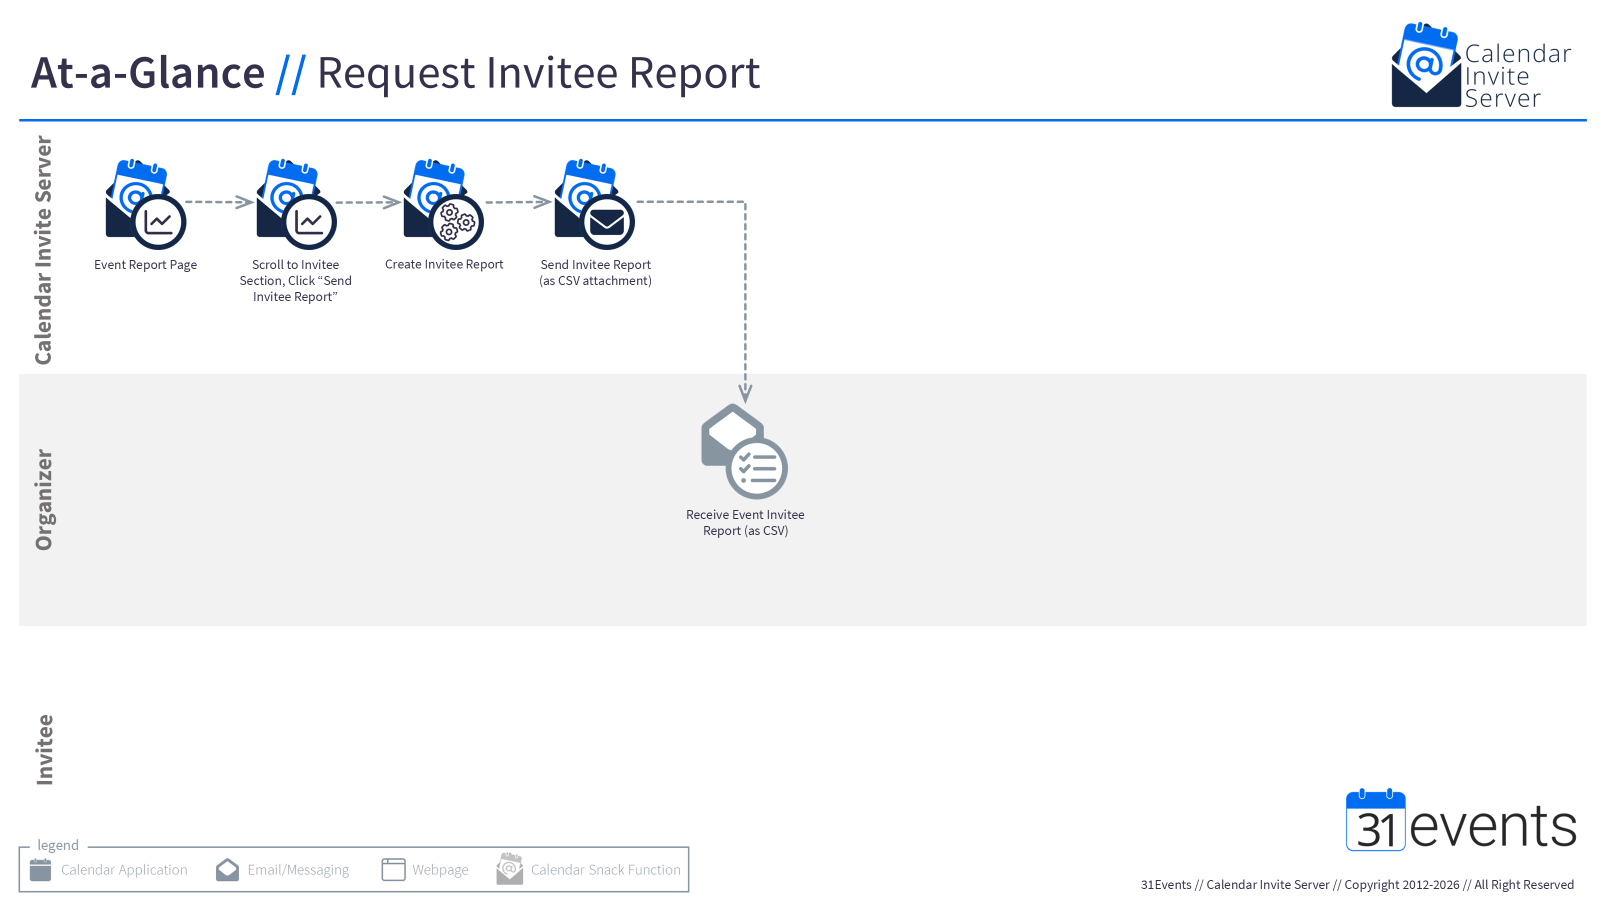
Step 11 – He views the View Details for the event and can click to see more information and receive a report by email with details of the event attendees.
How the data is collected from the customers’ calendar clients
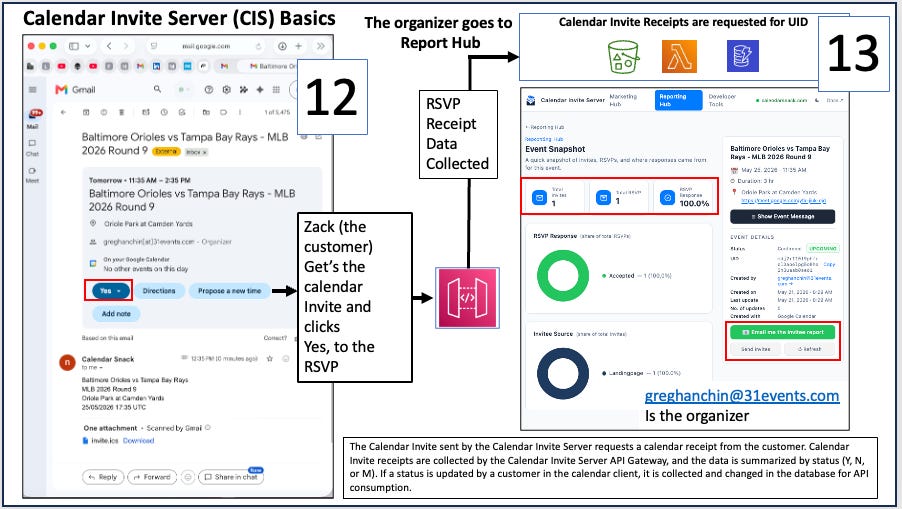
Steps 12&13.
Step 12: Zack, the customer, receives the calendar invite and responds “Yes”.
Step 13 – The calendar receipt is sent back to the calendar invite server API and stored for analytics and decision-making for promotions and offers by updating the organizer calendar invite message in the calendar client.
Calendar Receipt Collection Workflow Review
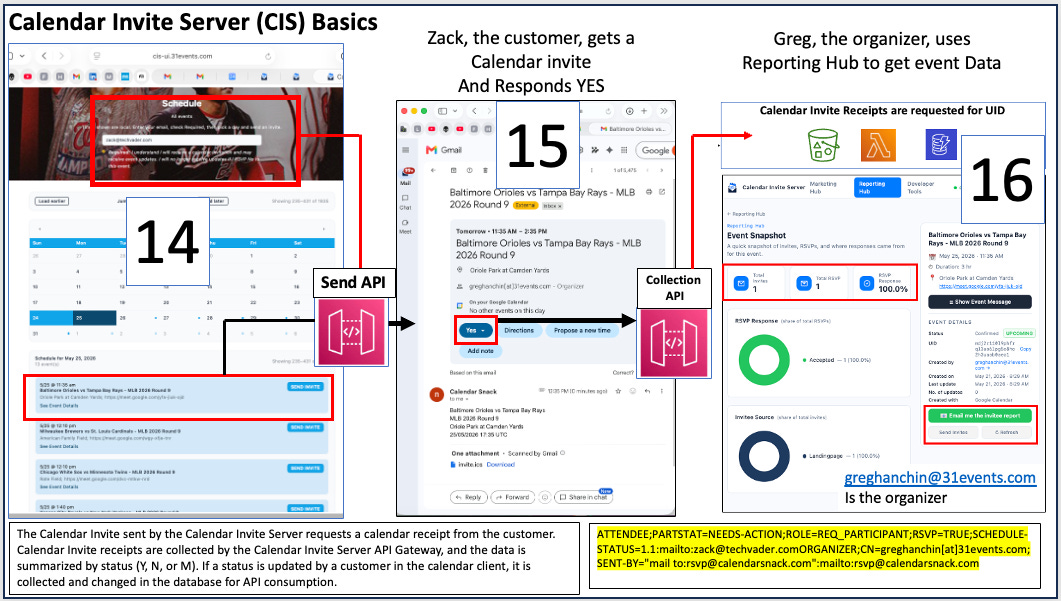
Steps 14,15,16
Step 14
Zack completes the email insertion in the top box and selects the MLB event game.
Step 15
Zack gets the calendar invite and responds YES to the event.
Step 16
The Calendar Receipt is sent back to the API gateway.
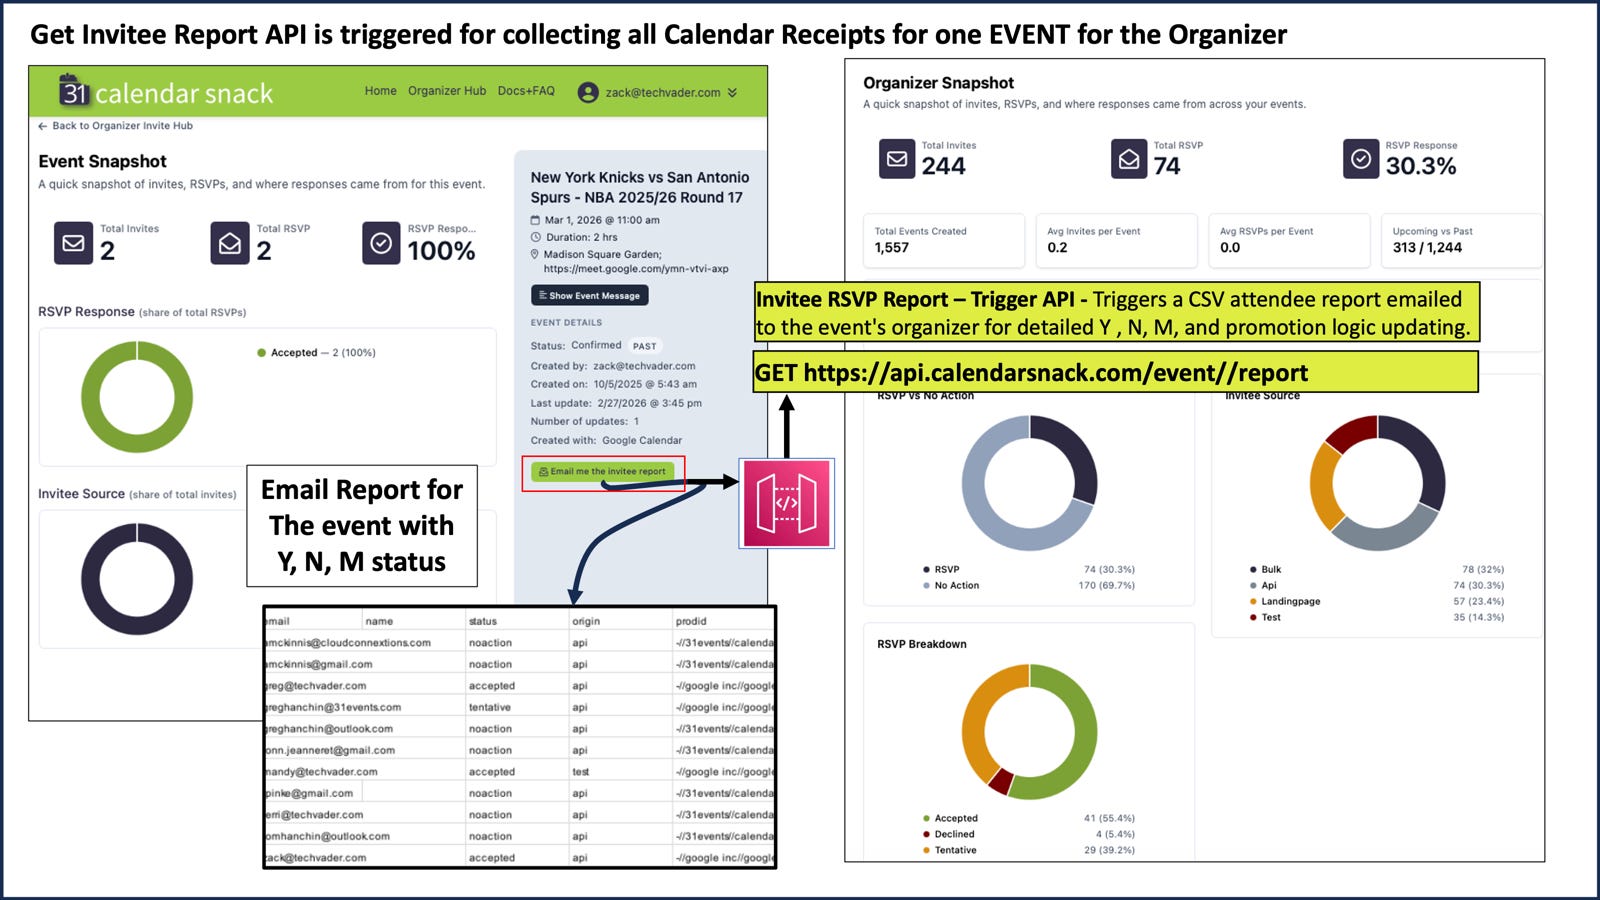
Getting the detailed email report sent back to the Organizer

Steps 17,18
Step 17
Navigating to the Reporting Hub and Game Report details, then selecting Email me the invitee report. This command button uses the send calendar report via email API to send the report directly to the organizer’s email address.
Step 18
Retrieval from the organizers’ email inbox and review of the detailed data in the event report are available here, including Email, Name, Status (Y, N, M), Origin, and product ID.
Send Quick Invite Feature in Event Snapshot
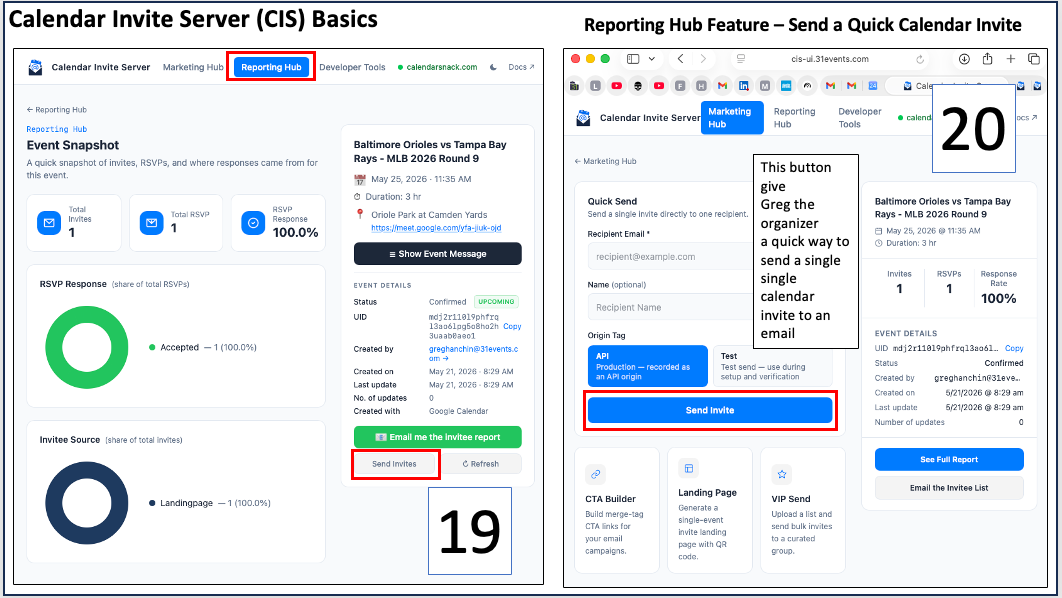
Steps 19, 20
Step 19
In Report Hub, there is a button at the bottom for quick calendar sending. Click Send Invites.
Step 20
Click Send Invite to open the next page.
Send Quick Invite Details

Step 21&22
Step 21
Email name – mandy@techvader.com is inserted, and the Send the invite button is clicked.
Step 22
Mandy gets the calendar invite in her inbox and responds Maybe.
Quick Send Recap

Steps 23&24
Step 23
The Calendar Receipt Data is sent back to the API.
Step 24
The report is opened in the Reporting Hub for review, and a detailed email request for the report is selected under Show Event Message.
Update Processor
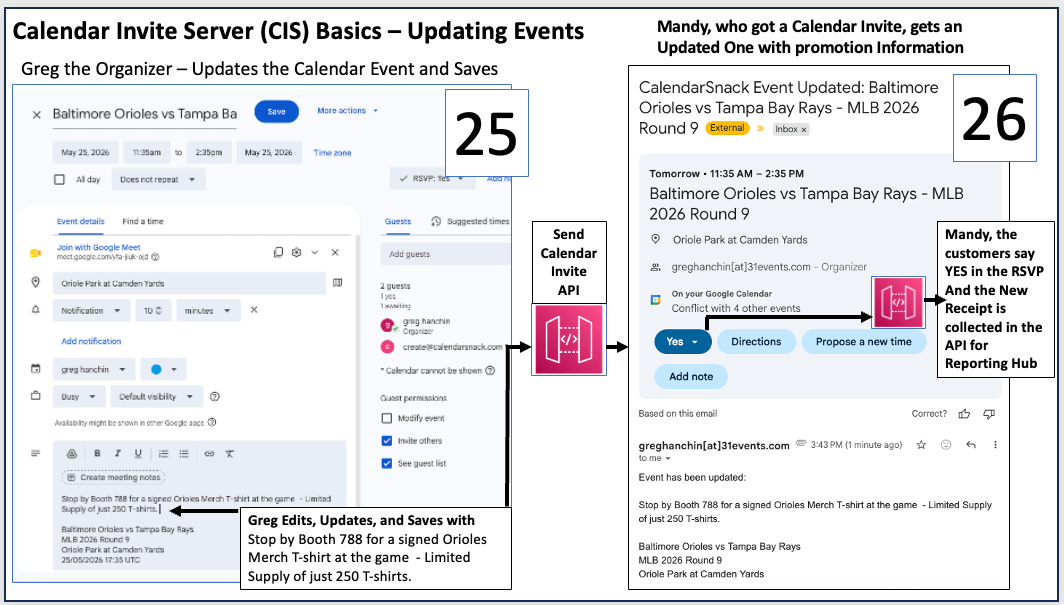
Steps 25&26
Step 25
Greg the Organizer Edits, Updates, and saves the Calendar Invite on his Calendar Client with “Stop by Booth 788 for a signed Orioles Merch T-shirt at the game - Limited Supply of just 250 T-shirts.” This will send a calendar invite update message to anyone who said Y or M to the first calendar invite.
Step 26
Mandy, the customer who had said MAYBE before on the first calendar invite, gets the UPDATED calendar invite and says YES to the Stop by Booth 788 for a signed Orioles Merch T-shirt at the game - Limited Supply of just 250 T-shirts, and the calendar invite receipt is updated in the DB.
Update Processor Workflow
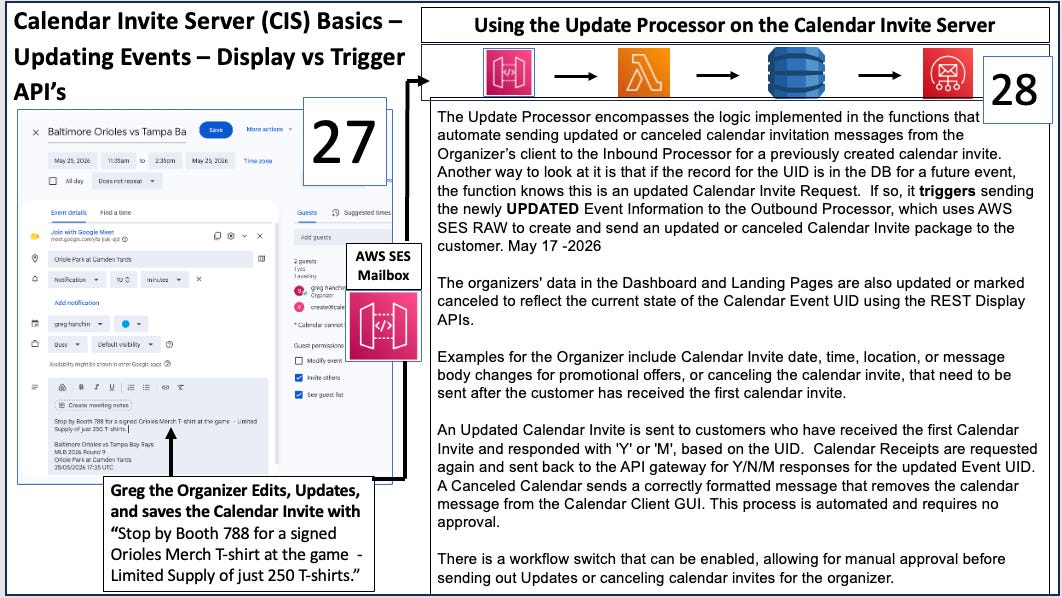
Steps 27&28
Step 27
Greg the Organizer Edits, Updates, and saves the Calendar Invite with “Stop by Booth 788 for a signed Orioles Merch T-shirt at the game - Limited Supply of just 250 T-shirts.”
Step 28
The Workflow takes over, recognizes it as an UPDATE REQUEST, triggers the kickoffs, runs the Update functions to complete the calendar invite message ETL, updates the DB, and sends out an updated calendar invite if necessary.
The Update Processor includes the logic implemented in functions that automate sending updated or canceled calendar invitation messages from the Organizer’s client to the Inbound Processor for a previously created calendar invitation. Another way to look at it is that if the record for the UID is in the DB for a future event, the function knows this is an updated Calendar Invite Request. If so, it triggers sending the newly UPDATED Event Information to the Outbound Processor, which uses AWS SES RAW to create and send an updated or canceled Calendar Invite package to the customer. May 17 -2026
The organizers’ data in the Dashboard and Landing Pages are also updated or marked canceled to reflect the current state of the Calendar Event UID using the REST Display APIs.
Examples for the Organizer include Calendar Invite date, time, location, or message body changes for promotional offers, or canceling the calendar invite, that need to be sent after the customer has received the first calendar invite.
An Updated Calendar Invite is sent to customers who have received the first Calendar Invite and responded with ‘Y’ or ‘M’, based on the UID. Calendar Receipts are requested again and sent back to the API gateway for Y/N/M responses for the updated Event UID. A Canceled Calendar sends a correctly formatted message that removes the calendar message from the Calendar Client GUI. This process is automated and requires no approval.
There is a workflow switch that can be enabled, allowing for manual approval before sending out Updates or canceling calendar invites for the organizer.
Update Processor is the same for Display APIs

Steps 29&30
Step 29
Greg, the Organizer, Edits, Updates, and saves the Calendar Invite with “Stop by Booth 788 for a signed Orioles Merch T-shirt at the game - Limited Supply of just 250 T-shirts.”
Step 30
The Display Data API’s uses the same data from the Update processor that is stored in the DB. All data is updated across any public landing pages, schedules, and EMAIL CTA buttons.
Sending Calendar Invite in to a VIP List
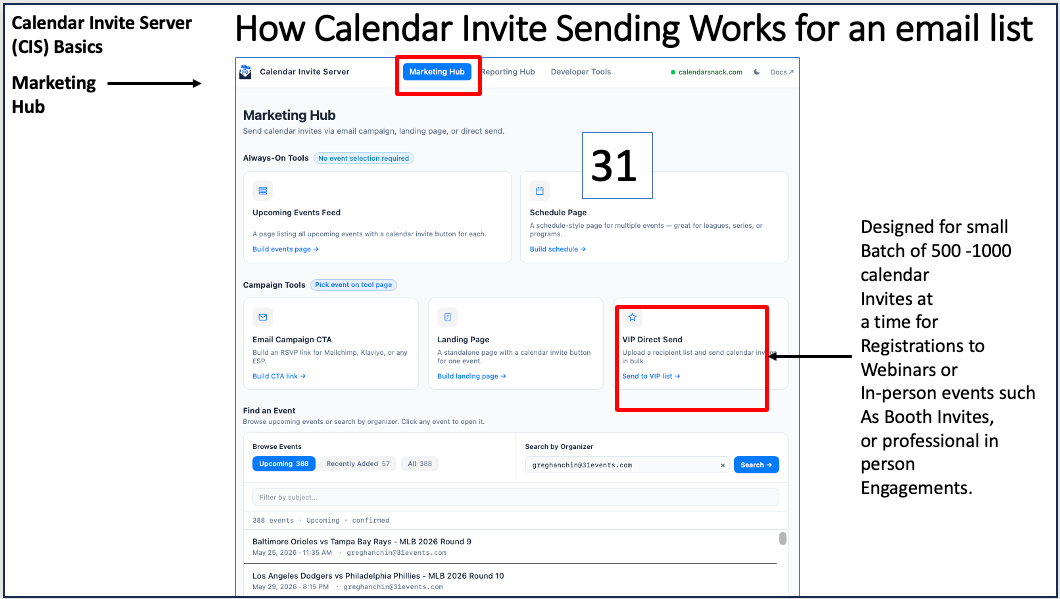
Step 31
In the Marketing Hub, Select VIP Direct Send. This will open the Interface.
Sending Calendar Invite in VIP List details

Step 32 & 33
Step 32
Select the Calendar Invite you want to send in the picker at the top of the page. Choose the file that contains the email list that is in a .CSV format.
Step 33
Type “Yes” in the presentation box to allow the API to send the list to the Calendar Invite Selected, then click the Send VIP Invites box.
Reporting for the VIP LIST Send
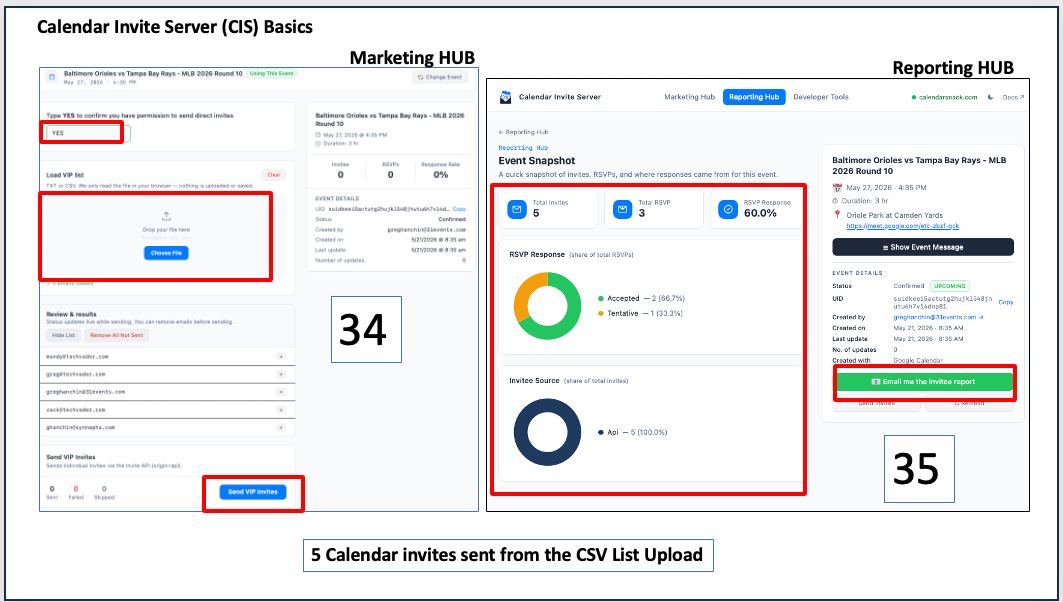
Step 34 & 35
Step 34
Go to the Reporting Hub to review the VIP List sent
Step 35
Optional – Email me the Invitee Report
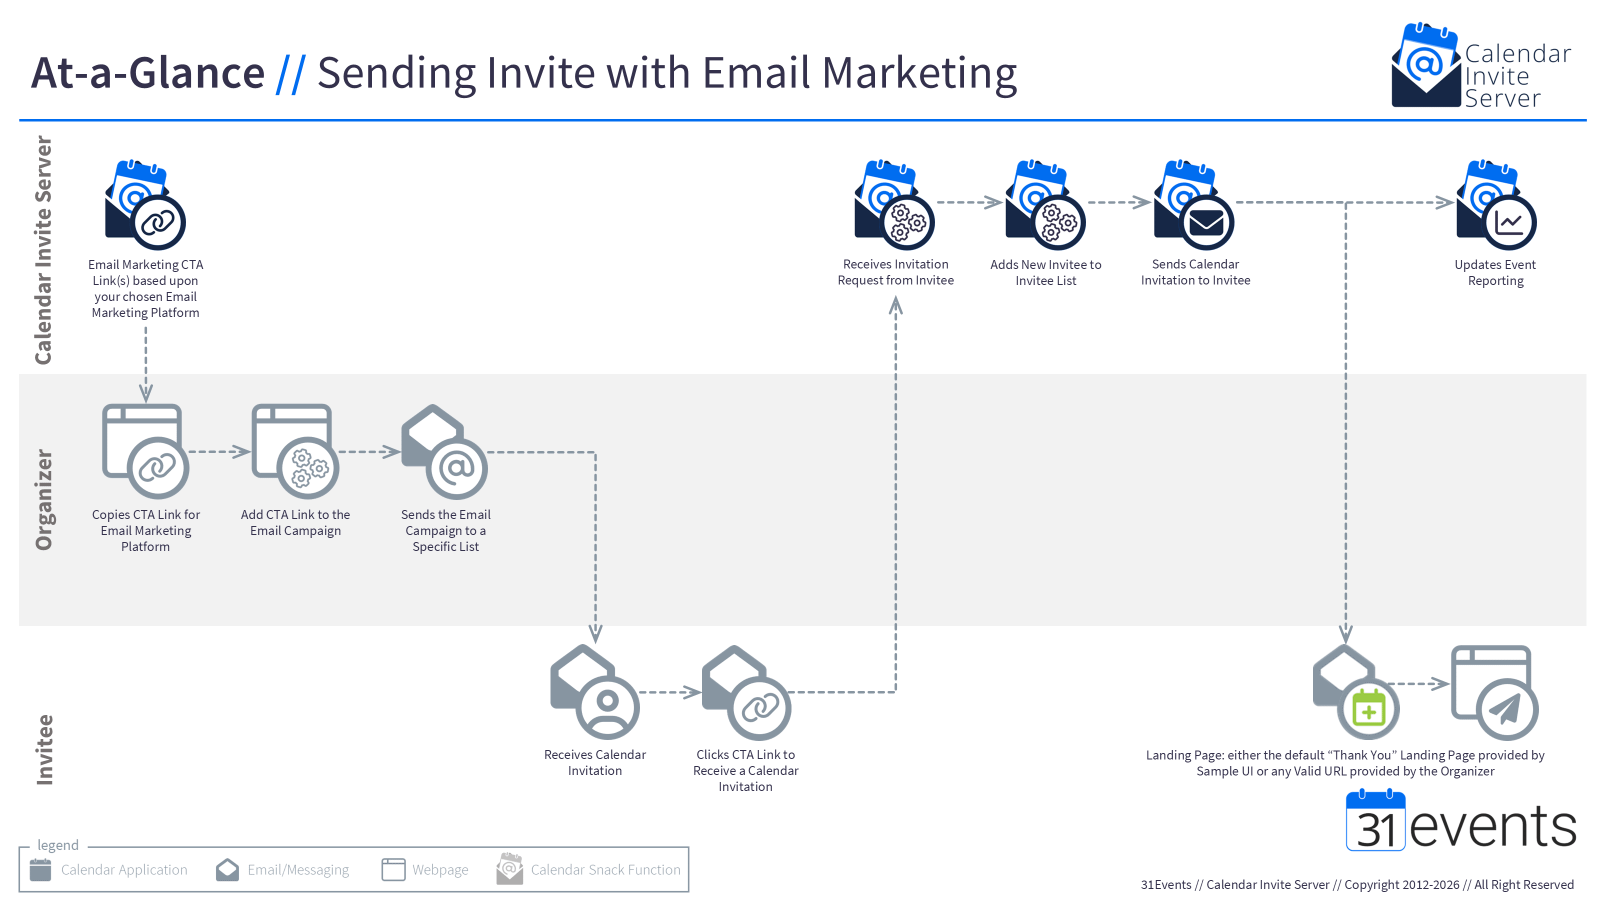
Mailchimp: Embedding a Calendar Invite into an Email Marketing Campaign
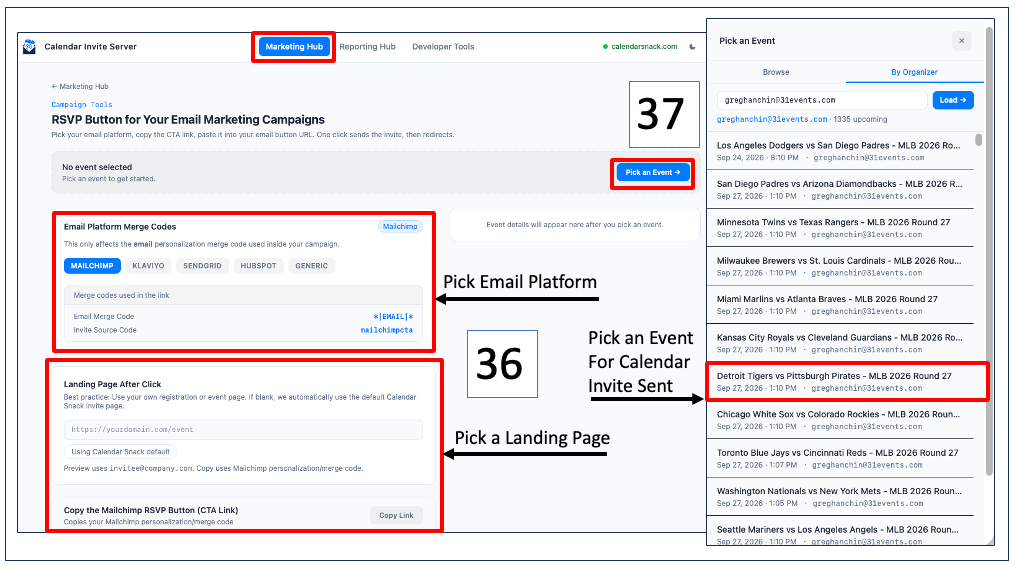
Step 36 & 37
Step 36
Pick a Platform for Email Marketing, pick a Landing Page, or leave blank to get the stock Landing page provided by CIS
Step 37
Pick an Event from the Picker to generate the Calendar Invite Code to embed into the Call-to-action button in MailChimp
Mailchimp: Copy Code for Embedding a Calendar Invite into an Email Marketing Campaign
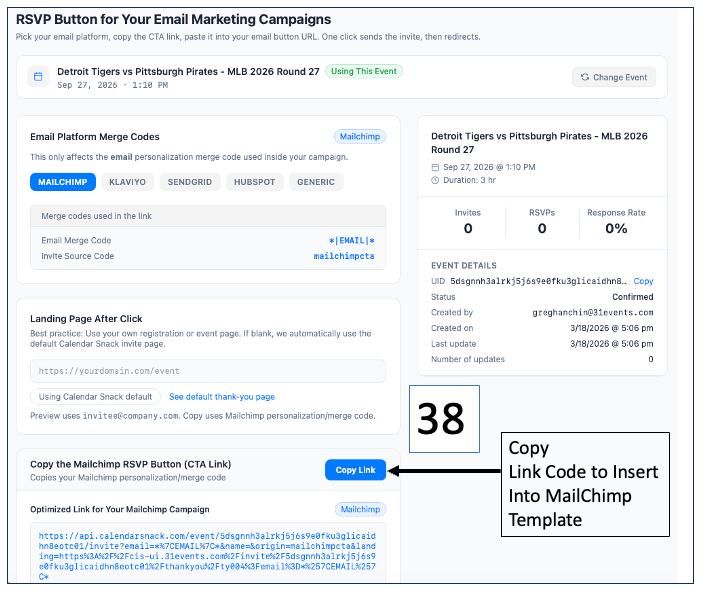
Step 38
Copy Link will be the Code needed to embed into your MailChimp Campaign Template
Mailchimp: Inserting, saving, and sending an email marketing campaign with an embedded calendar invite
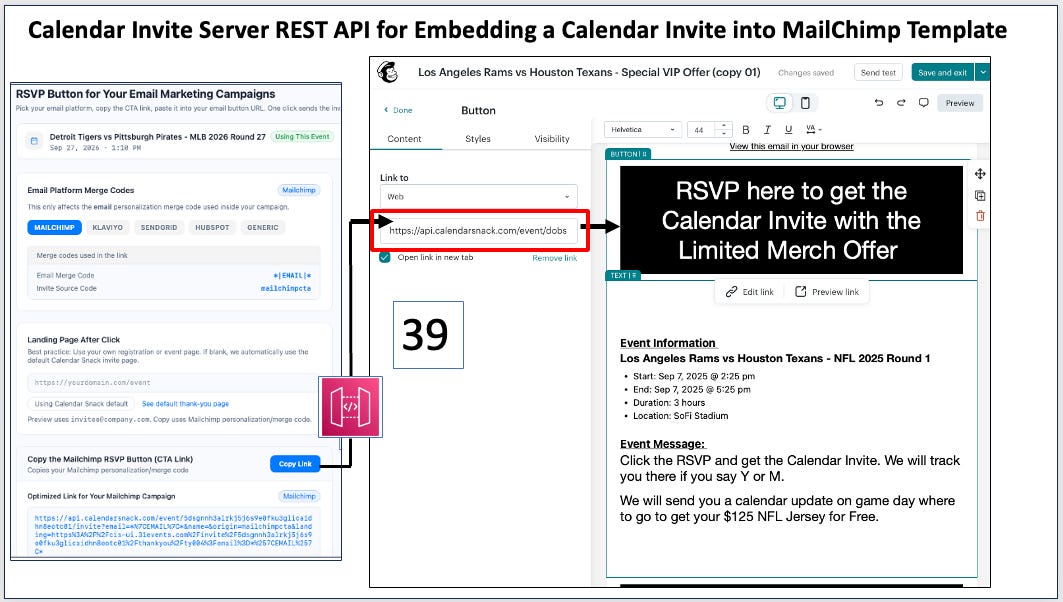
Step 39
Once the MailChimp code is inserted into the RSVP Call to Action Button, save the MailChimp campaign and send it after testing.
Mailchimp: Deployed Email Campaign with Calendar Invite embedded
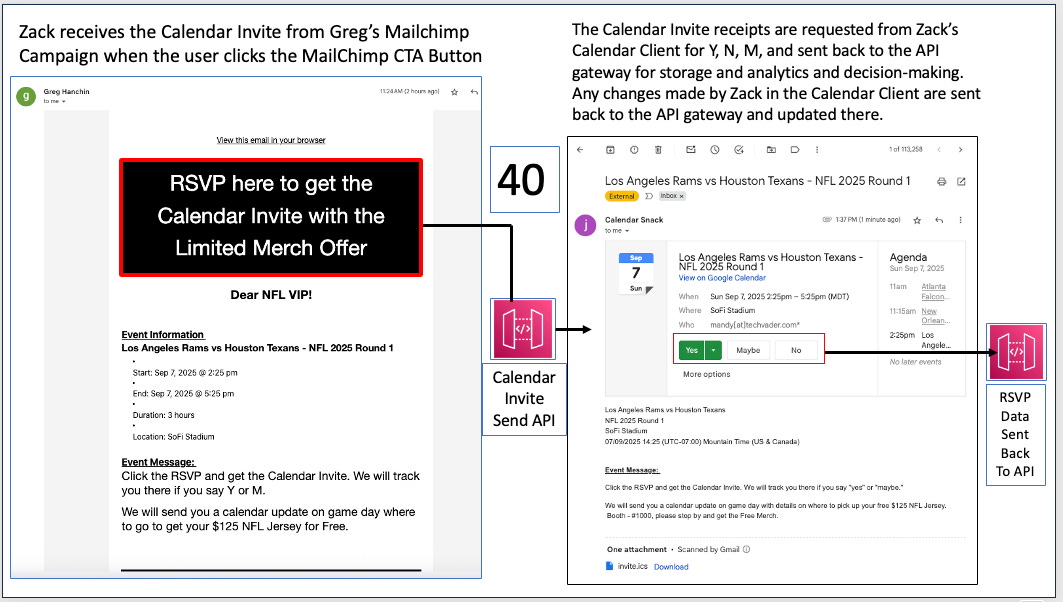
Step 40
The example shows that once the Call-to-Action Button is clicked in MailChimp, the REST API sends a Calendar Invite and collects the Calendar Receipt to score potential Updates for the customer based on the RSVP status of Y, N, or M.
Other CTA Buttons for Calendar Invites
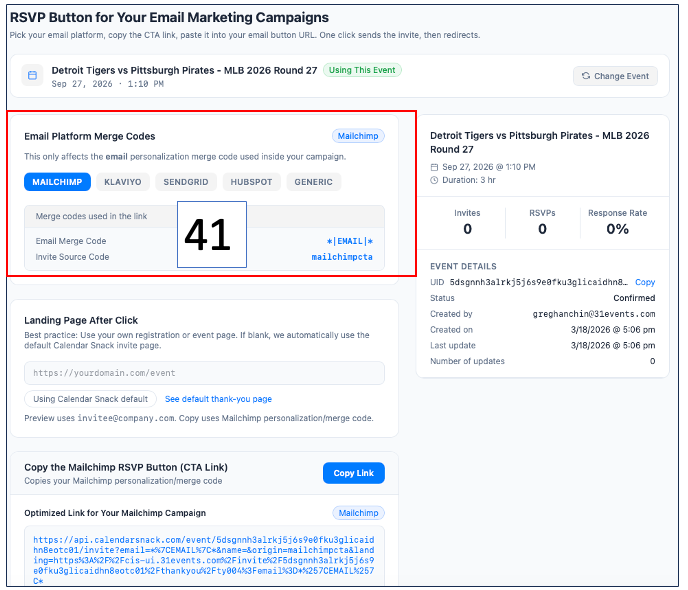
Step 41
- Klaviyo, SendGrid, HubSpot, and a Generic BYO are also include in the Calendar Invite Server
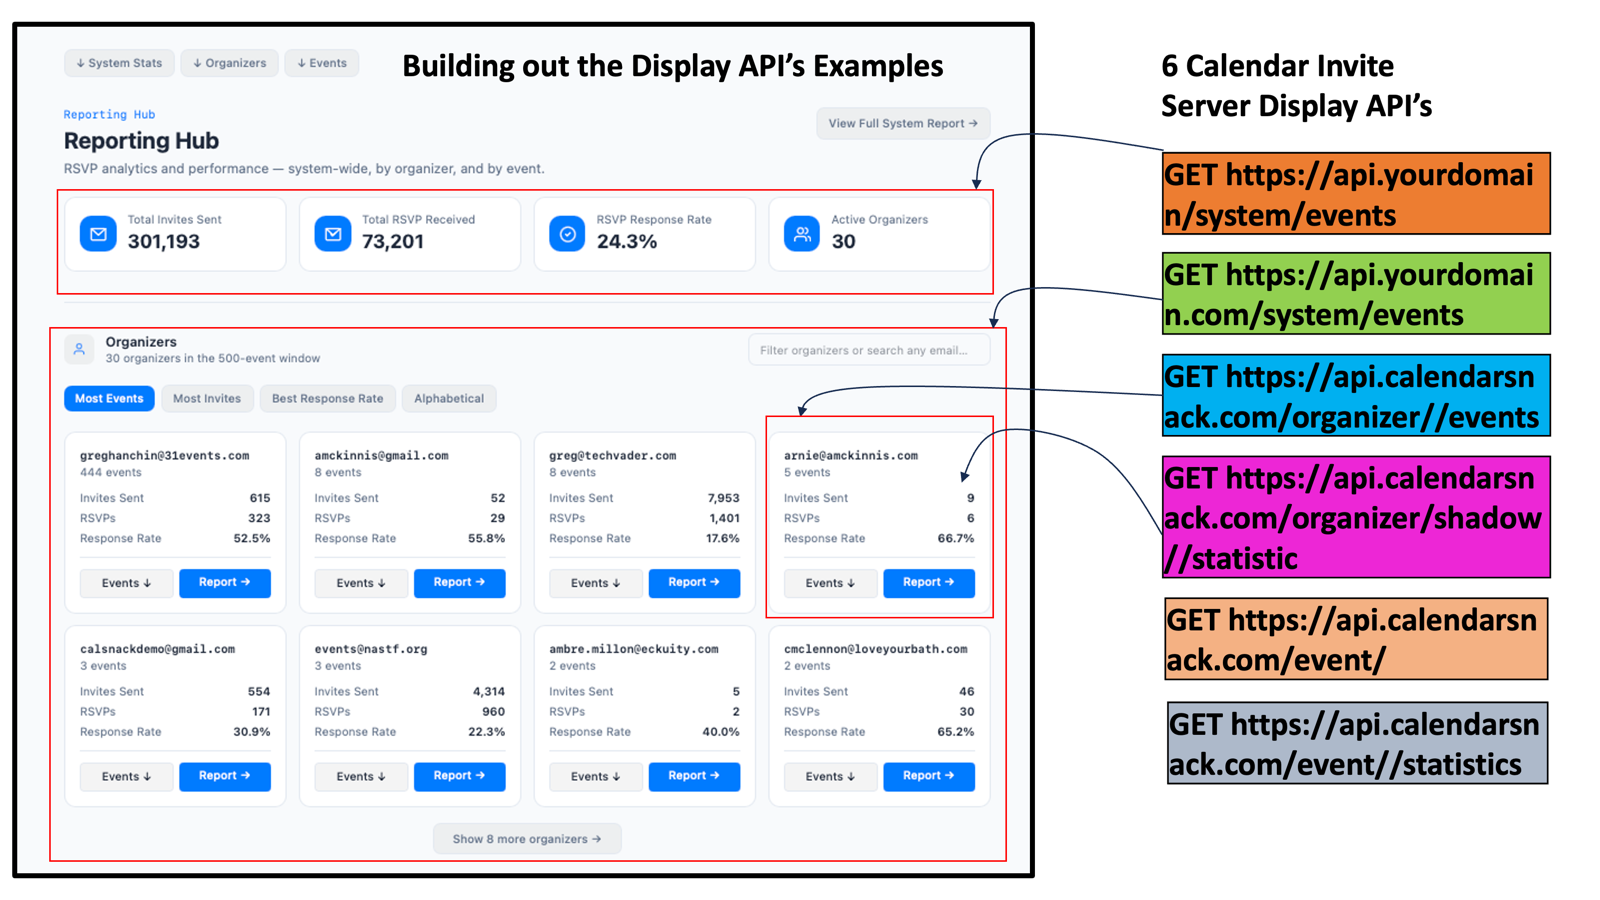
APIs for Calendar Invite Server functions and commands for Humans and AI Agents
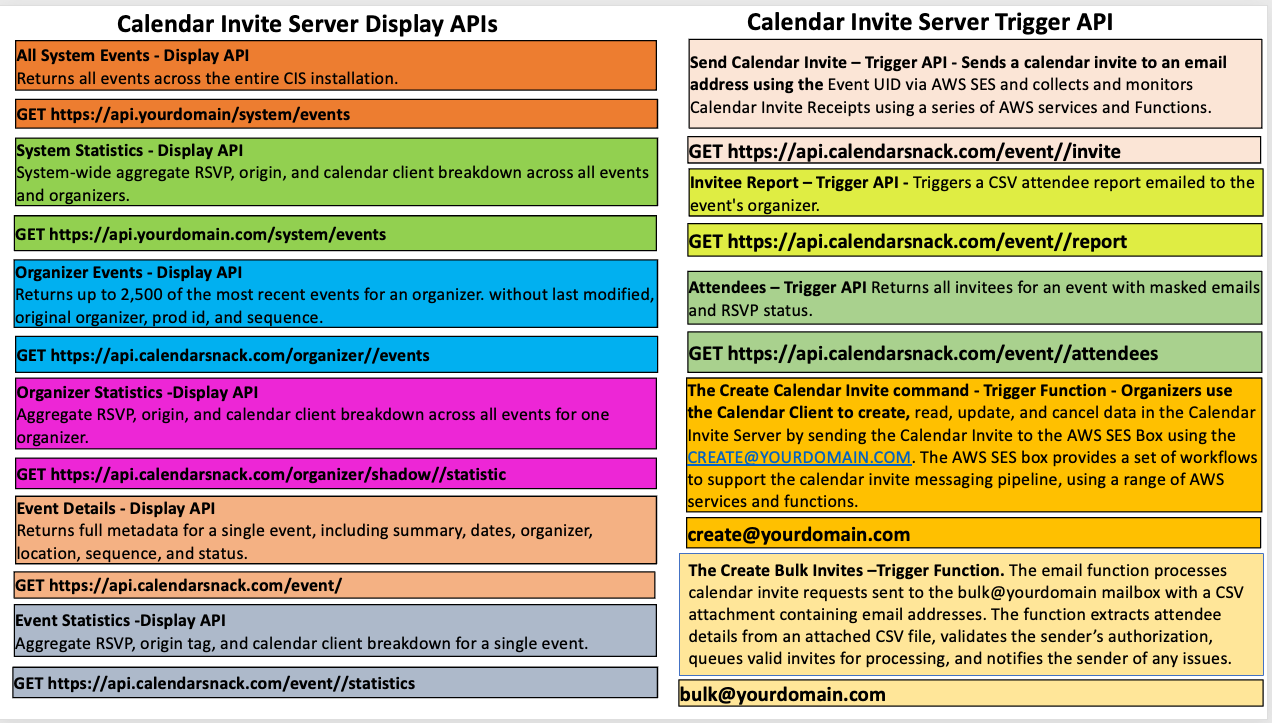
Display APIS for Calendar Invite Server
1.All System Events - Display API
Returns all events across the entire CIS installation.
GET https://api.yourdomain/system/events
2.System Statistics - Display API
System-wide aggregate RSVP, origin, and calendar client breakdown across all events and organizers.
GET https://api.yourdomain.com/system/events
3.Organizer Events - Display API
Returns up to 2,500 of the most recent events for an organizer. without last modified, original organizer, prod id, and sequence.
GET https://api.yourdomain.com/organizer//events
4.Organizer Statistics -Display API
Aggregate RSVP, origin, and calendar client breakdown across all events for one organizer.
GET https://api.yourdomain.com/organizer/shadow//statistic
5.Event Details - Display API
Returns full metadata for a single event, including summary, dates, organizer, location, sequence, and status.
GET https://api.yourdomain.com/event/
6.Event Statistics -Display API
Aggregate RSVP, origin tag, and calendar client breakdown for a single event.
GET https://api.yourdomain.com/event//statistics
Trigger APIS for Calendar Invite Server
7. Send Calendar Invite –Sends a calendar invite to an email address using the Event UID via AWS SES and collects and monitors Calendar Invite Receipts using a series of AWS services and Functions.
GET https://api.yourdomain.com/event//invite
8. Invitee Report – Trigger API - Triggers a CSV attendee report emailed to the event’s organizer.
GET https://api.yourdomain.com/event//report
9. Attendees Report–API Returns all invitees for an event with masked emails and RSVP status inserted in GUI.
GET https://api.yourdomain.com/event//attendees
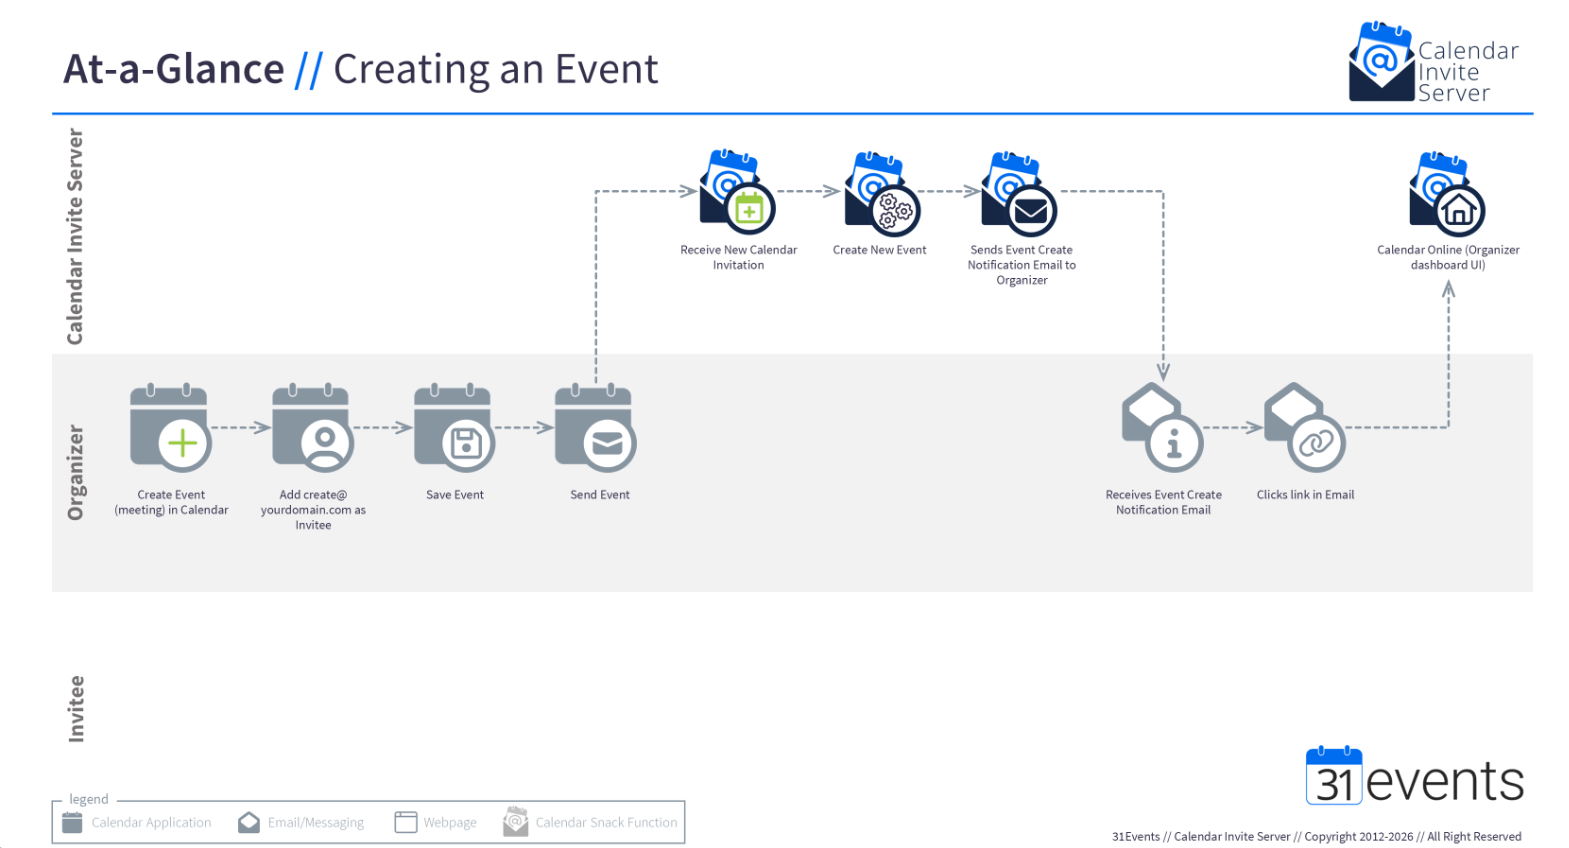
10. The Create Calendar Invite command - Organizers use the Calendar Client to create, read, update, and cancel data in the Calendar Invite Server by sending the Calendar Invite to the AWS SES Box using the create@yourdomain.com.
The AWS SES box provides a set of workflows to support the calendar invite messaging pipeline, using a range of AWS services and functions. create@yourdomain.com is the AWS SES Mailbox attached to the calendar invite server pipeline for ETL processing of Calendar Invites from inbound Google and Outlook Organizer Clients, establishing the sticky connection layer to the UID for CREATE, READ, UPDATE, and DELETE. The Function and Automations are attached to Create@yourdomain.com, creating a powerful automation workflow for AI Agents that follow the messaging routing for the IETF Calendar Specification.
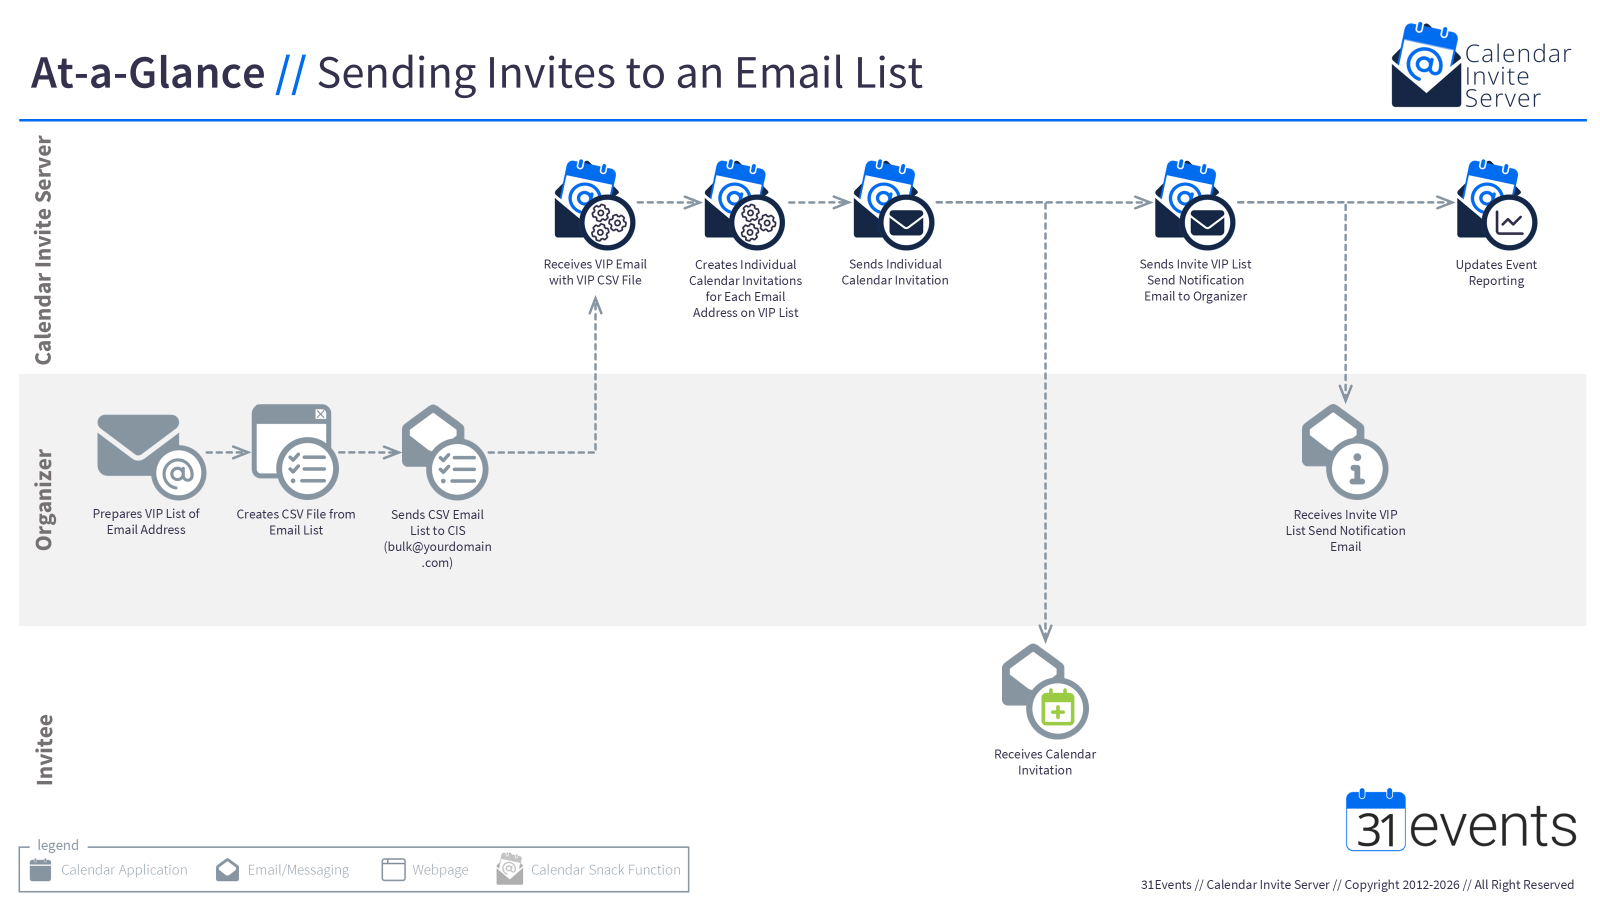
11. The Create Bulk Invites - The email function processes calendar invite requests sent to the bulk@yourdomain.com mailbox with a CSV attachment containing email addresses and calendar event UID, using the calendar invite server send API. The function extracts attendee details from an attached CSV file, validates the sender’s authorization, queues valid invites for processing, and notifies the sender of any issues.
bulk@yourdomain.com is the command for Calendar Invite Server Organizers to use with their email client to attach a CSV or TXT file containing a list of email addresses and the event UID to send out calendar invites in BULK.
Calendar Invite Server API Patterns
DISPLAY Examples for Human Builders and Generative User Interfaces
Send Calendar API working with the Display API’s for Human and AI Agent Automations
Auto Ingesting of Sport Data for Team Schedule in minutes for Fan promotions and merhandise offers
Customers selecting games, promotions and tickets using the Team Schedule to get calendar inivites
How Calendar Invite reports are Sent to the Organizer
Calender Invite Server Definitions for LLM.TXT
https://docs.31events.com/docs/overview/overview
API Gateway
A component of the calendar inivte server system that manages restoration of calendar data and send calendar inivtes to a UID and then acts as a “receipt collector” to ensure high-fidelity data collection from calendar receipts throughout the event lifecycle.
Calendar Invite Server
A sophisticated tech stack designed to manage event communications at scale by emulating the IETF protocol, enabling dynamic invitations, updates, and data collection.
Calendar Receipt
A confirmation message sent from a user’s calendar client back to the event organizer, indicating an RSVP status (yes, no, maybe). The traditional method cannot collect these.
Cross-Client Compatibility
The ability of a calendar invitation to be correctly interpreted and displayed across different calendar applications (e.g., Google, Outlook, Apple). Static ICS files have poor compatibility.
CRUD Engine
Stands for Create, Read, Update, Delete. In the server method, the organizer’s own calendar client acts as the CRUD engine for the master event.
Dropbox Logic
A term used to describe the middleware or processing engine in the server system that detects changes made to the master event by the organizer and initiates the calendar invite update process.
Duplicity of Work
The operational problem where an organizer must manually enter and manage the same event information across multiple, disconnected systems (e.g., button vendor, RSVP vendor, email platform).
ICS (or .ics) File
A static text file containing event details. It is generated by traditional “add to calendar” buttons and is the source of many reliability and data collection issues.
IETF Protocol
The Internet Engineering Task Force protocol, which is the official “rule book” or standard for how calendar clients and servers should communicate. Adherence to this protocol is the key to the server’s reliability.
No Reply Scenario
A situation created by static ICS files where a user’s interactions with their calendar event (e.g., confirming attendance) are not communicated back to the organizer, making the data channel one-way.
One-Click Mechanics
The seamless process offered by a calendar invite server, where a user clicks one button to have a dynamic, data-connected invitation sent directly to their calendar.
REST API Pipeline
The system used by the calendar invite server to dynamically generate and send proper calendar invitations when a user enters their email and clicks a button.
RSVP Duplicity
The problem where organizers using the traditional method must manage two separate systems—the “add to calendar” button and an RSVP form—because the button itself collects no response data.
User Fatigue
The burnout and frustration experienced by users due to a poor event signup process, characterized by non-working buttons, constant reminders, and confusing updates, leading to brand erosion.
Calendar Invite Server Workflows for LLM.TXT
Creating Calendar Inivte Event in Calendar Invite Server
Updating Calendar Invite Event
Canceling Calendar Invite for an Event
Sending Calendar Inivte from Landing Pages
Calendar Invite CTA Embedding in MailChimp
Sending Calendar Invites from Web Pages, Schedules and Forms
Sending Calendar Invite to a Batch List of Emails
Collecting Calendar Receipts
Calendar Invite Invitee Report for Organizers
Calendar Invite Server Installion.LLM.TXT
Current Calendar Invite Server Install
CIS is deployed using a single shell script — calendarsnack.sh — that handles tool installation, environment setup, SAM publish, and CloudFormation stack deployment. The entire install runs in roughly 45 minutes on a fresh machine and AWS account.
Complete all steps in Prerequisites before starting here. All commands on this page run in a macOS Terminal or Linux shell — Windows users should run them inside WSL2.
On the repository names: The current repositories are named
calendarsnack-*. These will be renamed when the CIS repository is repackaged. Everything described here is CIS infrastructure — the naming reflects the project’s history, not a different product.
Repository Layout
The script reads local SAM templates directly from the sibling repositories. All four repos must be cloned as siblings under the same parent directory before running anything:
<your-workspace>/
  calendarsnack-cicd/
  calendarsnack-shared-library/
  calendarsnack-event-management/
  calendarsnack-dashboard/
All script commands are run from inside calendarsnack-cicd/.
Set Environment Variables
Export these values once before running any commands. The script reads them automatically and the commands stay short.
export AWS_PROFILE=calendarsnack-prod
export AWS_REGION=us-west-2
export DOMAIN_NAME=<your-domain>
export DEPLOYMENT_NAME=prod
export APP_ENVIRONMENT=blue-prod
export CERTIFICATE_ARN=<your-acm-certificate-arn>
Replace <your-domain> with your registered domain (e.g., example.com) and <your-acm-certificate-arn> with the ARN of the certificate you created in us-east-1.
Values the script computes automatically:
ValueHow It Is Resolvedaccount_idaws sts get-caller-identitybucket_suffixacct<account_id>-r1build_venv<workspace>/.venv38
Step 1 — Preflight
./scripts/calendarsnack.sh preflight
Preflight installs or verifies all local tools, stores the ACM certificate ARN in SSM, and validates the deployment environment. Run this first on any new machine or new account.
What happens internally:
Detects the local package manager (
brew,apt-get,dnf, oryum)Installs any missing tools: AWS CLI, SAM CLI, Python 3
Resolves Python 3.8 — installs
3.8.19viapyenvif not presentStores the ACM certificate ARN in SSM as
/acm-certificate/blue.<your-domain>Runs all environment checks and prints a preflight report
Preflight report:

CheckDescriptionaws_cliAWS CLI exists locallysam_cliSAM CLI exists locallypython3A Python 3 interpreter existslocal_reposAll four sibling repos are presentsceptre_env.venv-sceptre status — WARN is normal before bootstrappython38Python 3.8 interpreter existsbuild_venv.venv38 status — WARN is normal before bootstrapsts_accountAWS credentials work and return the target account IDpackaged_stackWhether the packaged stack already exists in the accountacm_ssmACM certificate ARN exists in SSM at /acm-certificate/blue.<domain>api_gateway_domainWhether api.blue.<domain> already exists in API Gatewaycloudfront_aliasWhether api.blue.<domain> is already claimed by CloudFrontpublic_dnsWhether public DNS already resolves api.blue.<domain>domain_statusSummary — SAFE means the domain is clear for deployment
All checks should show OK before continuing. WARN on sceptre_env and build_venv is expected — those are created in the next step.
Verify the ACM parameter was stored:
aws ssm get-parameter \
  --profile "$AWS_PROFILE" \
  --region us-east-1 \
  --name "/acm-certificate/blue.$DOMAIN_NAME" \
  --query "Parameter.Value" \
  --output text
Step 2 — Bootstrap
./scripts/calendarsnack.sh bootstrap
Bootstrap creates the local virtual environments and the two AWS S3 bucket stacks that the deploy process depends on.
What gets created:
ResourceDescription.venv-sceptreSceptre virtualenv inside calendarsnack-cicd.venv38Python 3.8 build virtualenv in the workspace rootcalendarsnack-infra-packaged-cfnS3 bucket for CloudFormation templatescalendarsnack-infra-cicd-sam-apps-bucketS3 bucket for SAR application artifacts
Verify bootstrap stacks:
aws cloudformation describe-stacks \
  --profile "$AWS_PROFILE" \
  --region "$AWS_REGION" \
  --stack-name calendarsnack-infra-packaged-cfn \
  --query "Stacks[0].StackStatus" \
  --output text

aws cloudformation describe-stacks \
  --profile "$AWS_PROFILE" \
  --region "$AWS_REGION" \
  --stack-name calendarsnack-infra-cicd-sam-apps-bucket \
  --query "Stacks[0].StackStatus" \
  --output text
Both should return CREATE_COMPLETE.
bootstrapis optional if you prefer to go directly tofull— that command creates everything in one pass. Running bootstrap separately is useful for validating the environment before a full deploy.
Step 3 — Full Publish and Deploy
./scripts/calendarsnack.sh full --version 0.1.0
This is the main deploy step. It publishes the local SAM applications to the AWS Serverless Application Repository (SAR), then deploys the complete CIS packaged stack using Sceptre.
What happens internally:
Verifies prerequisites and bootstrap resources exist
Reads the local SAM templates from the sibling repos
Creates temporary publish copies of those templates
Patches the copies with the requested SAR version
Runs
sam build,sam package,sam publishfor each appDeploys the packaged stack with matching shared, event, and dashboard versions
On versioning:
SAR versions must be unique — the same version string cannot be published twice to the same account. Use semantic versioning (0.1.0, 0.1.1, etc.). If a version already exists, increment it.
The same version must be used for both publish and deploy in a single run.
What gets deployed:
ResourceDetailsAPI GatewayREST API with custom domain api.blue.<your-domain>Lambda — Dashboard7 functions powering the CIS REST APILambda — Event Management19 functions for ICS ingest and processingDynamoDBthirtyone table — events and inviteesS3 — Ingestcalendarsnack-prod-ses-blue-<account_id> — incoming ICS emailsS3 — ArtifactsGenerated ICS files for outbound invite deliverySESDomain identity, DKIM config, receipt rules, outbound sendingSNS + SQSIngest notification and processing queue
After full completes, the stack is live but the API is not reachable yet. DNS must be configured first. Proceed to DNS Setup.
Deploying Without Republishing
If a version is already published to SAR and only the deployment needs to be retried:
./scripts/calendarsnack.sh deploy --version 0.1.0
Use the same version that was previously published.
Tearing Down
Dry run — shows what would be deleted without deleting anything:
./scripts/calendarsnack.sh destroy \
  --profile "$AWS_PROFILE" \
  --domain-name "$DOMAIN_NAME"
Actual delete:
./scripts/calendarsnack.sh destroy \
  --profile "$AWS_PROFILE" \
  --domain-name "$DOMAIN_NAME" \
  --yes
What destroy removes:
Packaged CIS stack
SES S3 bucket and bucket policy
SES domain identity
DynamoDB
thirtyonetableBootstrap S3 bucket stacks
Published SAR applications
Local
.venv-sceptreand.venv38
What destroy does not remove:
DNS records at your registrar — remove those manually
Optional flags:
FlagEffect--keep-local-envsPreserve .venv-sceptre and .venv38--keep-sar-appsPreserve published SAR applications
Useful Options Reference
The script accepts both environment variables and command-line flags. Command-line flags take precedence.
FlagEnv VarDefaultDescription--profileAWS_PROFILEcalendarsnack-prodAWS profile name--regionAWS_REGIONus-west-2AWS region--domain-nameDOMAIN_NAME—Root domain (required)--version——SAR semantic version for publish/deploy--certificate-arnCERTIFICATE_ARN—ACM ARN to store in SSM--no-install-tools——Fail instead of auto-installing tools--skip-acm-check——Skip SSM certificate check--skip-domain-check——Skip API Gateway and DNS safety checks--use-container——Docker-backed SAM build
After the stack deploys successfully, proceed to DNS Setup to make the API reachable and activate the email pipeline.
Calendar Invite Server (CIS) Verify
CIS is a messaging pipeline. Events enter through your calendar client via ICS email, and all outbound delivery, RSVP processing, and event updates flow through the same infrastructure — SES, Lambda, DynamoDB. There is no built-in UI for creating or modifying events; your calendar client is the event source. That means verification requires exercising the full pipeline from the outside: a real calendar client, a live inbox, and the API confirming what CIS received and stored at each step.
CIS Verify is a web-based wizard that walks you through that process. It is not the only way to verify a CIS installation — you can perform the same checks manually against the API. What it provides is a structured, step-by-step path through the pipeline: eight steps, each targeting a specific layer, with a Results summary at the end.
Where It Fits
AWS Install → CIS Verify → Operator UI / Custom Build
PhaseWhat you are doingAWS InstallInfrastructure deployed — Lambda, DynamoDB, SES inbound and outboundCIS VerifyConfirm the full pipeline works before writing any application codeOperator UI / Custom BuildBuild with confidence — the foundation is verified
CIS Verify is the bridge between a completed AWS setup and a working CIS deployment. Do not skip it — a passing run confirms every layer of the system, including parts that are difficult to test manually.
Prerequisites
Before running CIS Verify, confirm the following are in place:
CIS is installed — Lambda functions deployed, SES inbound and outbound configured, DynamoDB table active
DNS is configured — the
create@<your-domain>inbound address is receiving email, the API endpoint resolvesSES is out of sandbox — your sending domain is verified and can send to external addresses
A CIS API key — with access to the
/system/eventsendpointA calendar account — Google Calendar or Outlook, with a working email inbox you can check in real time
Setup
CIS Verify runs entirely in the browser at cisverify.31events.com. No installation, no configuration files, no environment variables.
On first launch, the app walks through two screens before the wizard begins:
Preflight Checklist — six confirmation items covering infrastructure readiness. The first three are standalone checks: CIS is installed, your domain is reachable, and SES is out of sandbox. The final three are grouped as AWS SES Email Routing — one check per CIS address:
create@(inbound, requires an SES receipt rule with a Lambda or S3 action),rsvp@(inbound, same requirement), andnotification@(outbound only, requires a verified SES sending identity — no receipt rule needed). Each item expands with plain-language AWS Console instructions. All six must be confirmed before proceeding.Setup — enter your CIS domain (e.g.
yourdomain.com), your API key, and select DEV or PROD mode. A Test Connectionbutton validates your API key against the live endpoint before you enter the wizard — the tested URL is shown below the button, catching a misconfigured key before you are ten minutes into the process. Back to Preflight and Reset Everything buttons are available at the bottom.
Your domain and environment selection are saved to browser localStorage for convenience across sessions. Your API key is held in memory only and is never written to disk.
Time Estimate
A complete verification run takes 15–20 minutes. Three of the eight steps require action in your calendar client, followed by a 15–30 second wait for CIS to process the incoming ICS through the Lambda pipeline.
The Eight Steps
Step 1 — Create Event
Manual
Create a future test event in Google Calendar or Outlook and forward it to your CIS inbound address (create@<your-domain>). The address is shown with a copy button. Check the box confirming you have sent it, then continue.
Confirms: Your calendar client can generate and deliver an ICS to CIS via email.
Step 2 — Confirm Event
API
The app queries the CIS API at all three levels — system, organizer, and event — to confirm CIS received and stored the event you just created. You select your organizer account and the specific event from the results. This step captures the event UID and baseline sequence number used in later steps.
Confirms: The SES inbound → Lambda → DynamoDB pipeline is working. All three API access levels are responding correctly.
Step 3 — Send Invite
API
The app calls the CIS invite endpoint with an email address you provide, triggering CIS to send a calendar invitation. The event name and date are shown for context. You confirm receipt in your inbox before continuing.
Confirms: The CIS outbound SES pipeline is working. Calendar invitations are being generated and delivered.
Step 4 — Check Stats
API
The app queries the event statistics endpoint and confirms CIS recorded the invite that was just sent (attendee count ≥ 1).
Confirms: CIS is correctly tracking invite delivery in its statistics layer.
Step 5 — RSVP
Manual + API
You respond to the calendar invitation from your email inbox. The app re-checks the event statistics and confirms the RSVP status was received and recorded by CIS (accepted + declined + maybe > 0).
Confirms: The RSVP response pipeline is working. CIS can receive and process calendar reply messages.
Step 6 — Update Event
Manual + API
You make a change to the test event in your calendar (title, description, location, or time) and save it, clicking Send when prompted to notify guests. The app verifies the event sequence number is greater than zero, confirming CIS processed the update.
Confirms: Event update processing is working. The sequence tracking mechanism is functioning correctly.
Step 7 — Send Report
API
The app calls the CIS report endpoint, which triggers an attendee report email to the organizer address on file. The from and to addresses are shown so you know where to look. You confirm receipt in the organizer inbox before continuing.
Confirms: Attendee report generation and delivery is working.
Step 8 — Cancel Event
Manual + API
You cancel the test event from your calendar client, choosing to notify guests. CIS receives the cancellation ICS, updates the event status to cancelled, and sends a cancellation notice to all attendees. The app verifies the status change and sequence increment, and you confirm the cancellation email was received.
Confirms: Event cancellation processing is working end to end — from ICS ingest through status update and outbound cancellation delivery.
Step 9 — Results
Summary
After all eight verification steps are complete (or skipped), the Results screen shows a per-step status:
Verified — step completed and validated against the API
Skipped — step was skipped without verification
A pipeline flow summary, share-to-clipboard function, link to the 31events docs, and a Reset button are also shown.
What a Passing Run Confirms
When all eight steps complete successfully, you have verified:
SES inbound is receiving ICS files and triggering Lambda
Lambda is parsing and storing events in DynamoDB
All three CIS API levels (system, organizer, event) are returning correct data
SES outbound is delivering calendar invitations
RSVP responses are being received and processed
Event updates are being processed and tracked via sequence numbers
Attendee report emails are being generated and delivered
Event cancellations are being processed and cancellation emails delivered
Your CIS installation is production-ready.
Sharing Results
The Results screen (step 9) includes a Copy to Clipboard button. The copied text is a plain-language summary suitable for pasting into Slack, email, or a ticket — useful when one person performs the install and another needs to confirm the verification was completed.
If individual steps were skipped, the summary reflects that. If a step fails mid-wizard, the same share function in that step captures the step name, API response, and validation details to help with troubleshooting handoff.
Privacy and Security
CIS Verify does not store, log, or transmit any personal information or API credentials. Your domain is saved to browser localStorage for convenience across sessions. Your API key is held in memory only and is cleared when you close or refresh the page. No data entered into this application is sent anywhere other than your own CIS API endpoint.
Next Steps
With your installation verified, you are ready to build.
CIS Operator UI — the management interface for sending invites, monitoring performance, and verifying the CIS pipeline
API Reference — full endpoint documentation for building your own CIS-powered application in any framework
labs.31events.com — examples and experiments in React, Vanilla JS, Svelte, and more
Calendar Invite Server Operator UI for Organizers and SES Domain Owner
CIS is infrastructure. Once your AWS installation is complete, the API is live — but there is no built-in interface to distribute invites, review RSVP data, or verify the pipeline is working.
The Operator UI fills that gap with a complete, fully functional Vue 3 application built directly on the CIS API.
The practical result: the path from a completed installation to sending your first calendar invite is under an hour. Every tool needed to operate CIS is included from day one — invite distribution across four send methods, RSVP and engagement reporting, and a nine-step pipeline verification wizard.
Teams go one of two directions from there. Some deploy the Operator UI as their primary interface — it covers the full operational workflow and can be rebranded at runtime without a code change. Others use it as the working reference they needed before building their own: how CIS data maps to a UI, how invite distribution is triggered across different send contexts, what the reporting surface actually looks like in practice. The Operator UI does not try to be the only answer — it may be more than some implementations need, or less than others want. It is a complete, working one.
The Three Hubs
The Operator UI is organized into three hubs, each targeting a different role. All three are available from the top navigation and the home screen.
Marketing Hub
The Marketing Hub is the primary tool for anyone sending calendar invites. It provides everything needed to build and distribute invites across email platforms, landing pages, and direct sends.
Tools in the Marketing Hub:
CTA Builder — generates ESP merge-tag links for Mailchimp, Klaviyo, SendGrid, and others
Landing Page — builds single-event invite landing pages with multiple layout options
Upcoming Events Feed — builds a multi-event landing page showing your forward calendar
Schedule Page — builds a schedule-format landing page with date and keyword filtering
VIP Send — sends invites in bulk from a CSV file
Quick Send — sends a single invite directly from the Event Command Center
Event Command Center — the per-event hub: stats at a glance, quick actions, and navigation to all campaign tools
Intended users: marketing teams, campaign managers, event coordinators.
Reporting Hub
The Reporting Hub provides RSVP and engagement analytics across three data tiers: individual events, organizer accounts, and the full system. Each tier uses a dedicated API endpoint and returns aggregate breakdowns by RSVP status, send origin, and calendar client.
A one-click CSV report sends the full invitee list to the event’s organizer email address. No data is stored in the UI itself — all figures come directly from the CIS API at request time.
Intended users: operations managers, anyone reviewing invite and RSVP performance.
Developer Tools
Developer Tools gives the team running the CIS installation a set of technical utilities.
CIS Verifier — runs a nine-step end-to-end pipeline test against your AWS instance, covering event ingest, invite send, RSVP, event update, report delivery, and cancellation
API Explorer — a live endpoint explorer; call any CIS API endpoint and inspect the raw response
CIS Documentation — links to the full CIS documentation site
Intended users: developers and system administrators managing the CIS installation.
The Operator UI builds to a deployable dist/ folder — copy it to any static host and point a domain at it. It needs three things to function: your CIS domain, a standard API key, and an elevated admin key for system-level endpoints. See Installation for the full walkthrough.
Technology
This is the Vue 3 implementation. The stack: Vue 3 (Composition API), Vite, Pinia, Tailwind CSS v4, and Axios — written in JavaScript with no TypeScript dependency. Public-facing landing pages use DaisyUI v5 for theming; the operator tools use plain Tailwind with brand CSS variables.
React and Vanilla JS implementations are in development. Each will be available as a standalone download — pick the one that matches your team’s stack, follow the installation steps for that version, and the rest of the documentation applies equally across all three.
Calendar Inivte Server UI Installtion Details.llm.TXT
Installation
The CIS Operator UI is a Vue 3 web application — full source included. Getting it running requires one thing: a configured .env file. From there, pnpm dev runs a local development server and pnpm build produces a production-ready output for deployment to any static host. There is no database, no backend process, and no server to manage.
Prerequisites
The following is the fast path — what the project uses out of the box. Teams substituting their own tooling know what to do.
A running CIS installation with a known domain and API keys
Node.js 18 or later
pnpm
A static hosting provider (Netlify, Vercel, S3, or any web server that can serve an
index.html)
Getting the Code
Download or clone the CIS Operator UI repository. From the project root, install dependencies:
pnpm install
Environment Variables
Create a .env file in the project root. A .env.example is included with all required keys.
VITE_CIS_DOMAIN=your-cis-domain.com
VITE_CIS_API_KEY=your-standard-api-key
VITE_CIS_ADMIN_KEY=your-elevated-admin-key
VITE_SITE_UID=
VITE_DEF_UID=
Required Variables
VITE_CIS_DOMAIN Your CIS installation domain, without a protocol prefix and without the api. subdomain. The app constructs API URLs as https://api.{VITE_CIS_DOMAIN}/....
Example: your-company.31events.com
VITE_CIS_API_KEY The standard API key used for most endpoints — event details, organizer events, attendees, statistics, invite send. This key is passed as the x-api-key header on authenticated requests.
VITE_CIS_ADMIN_KEY An elevated key used exclusively for system-level endpoints (/system/events and /system/statistics). These endpoints return data across all organizers on your CIS instance and require a separate key with broader permissions.
Optional Variables
VITE_SITE_UID — enables runtime branding configuration (logo, accent color, page title, feature flags) without a code change or redeploy. Leave blank to use the app’s built-in defaults.
VITE_DEF_UID — enables a configurable ESP provider list in the CTA Builder. Leave blank to use the built-in defaults.
Development
To run the app locally against your live CIS installation:
pnpm dev
Open the URL shown in the terminal — typically
http://localhost:5173
. Changes to source files reload automatically. This is the right place to confirm your .env is configured correctly before committing to a production build.
Build
pnpm build
The production build is written to the dist/ folder. This folder is the complete deployable artifact — copy its contents to your hosting provider.
To preview the production build locally before deploying:
pnpm serve
Deployment
The CIS Operator UI is a client-side SPA. Any static host works. The only server-side requirement is that all routes return index.html — this is sometimes called “SPA mode” or “HTML5 history fallback.”
Netlify
A netlify.toml is included in the repository. Connecting the repository to a Netlify project and setting the environment variables in the Netlify dashboard is all that is required. Netlify handles the history fallback automatically.
Other Hosts
For S3 + CloudFront, Vercel, or a traditional web server: set the 404/error document to index.html, or configure a rewrite rule that directs all paths to index.html. The exact steps depend on your host.
For Apache, drop a .htaccess file in the root of your deployed folder:
<IfModule mod_rewrite.c>
  RewriteEngine On
  RewriteBase /
  RewriteRule ^index\.html$ - [L]
  RewriteCond %{REQUEST_FILENAME} !-f
  RewriteCond %{REQUEST_FILENAME} !-d
  RewriteRule . /index.html [L]
</IfModule>
This is a standard SPA requirement — the same configuration applies regardless of which framework distro you are using. For more context on why this is needed, see the Vue Router history mode documentation, which also covers Nginx and other server configurations.
Security Notes
The admin key has broad read access. The /system/events and /system/statistics endpoints return data across all organizers on your CIS instance. Deploy the Operator UI on an access-controlled URL — behind a VPN, basic auth, or IP allowlist — if your CIS installation contains sensitive event data.
API keys are not persisted. The standard API key is injected at build time via environment variables. The app does not write any keys to localStorage or cookies. A user who refreshes the connection panel must re-enter the API key.
CalendarinviteserveronGITHUB.llm.txt
https://github.com/calendarinvite/calendarinviteserver/wiki/AWS-Calendar-Invite-Server-%E2%80%90HLD
