

Inserting Calendar Invites into Web pages
The Calendar Invite Server (CIS) API’s


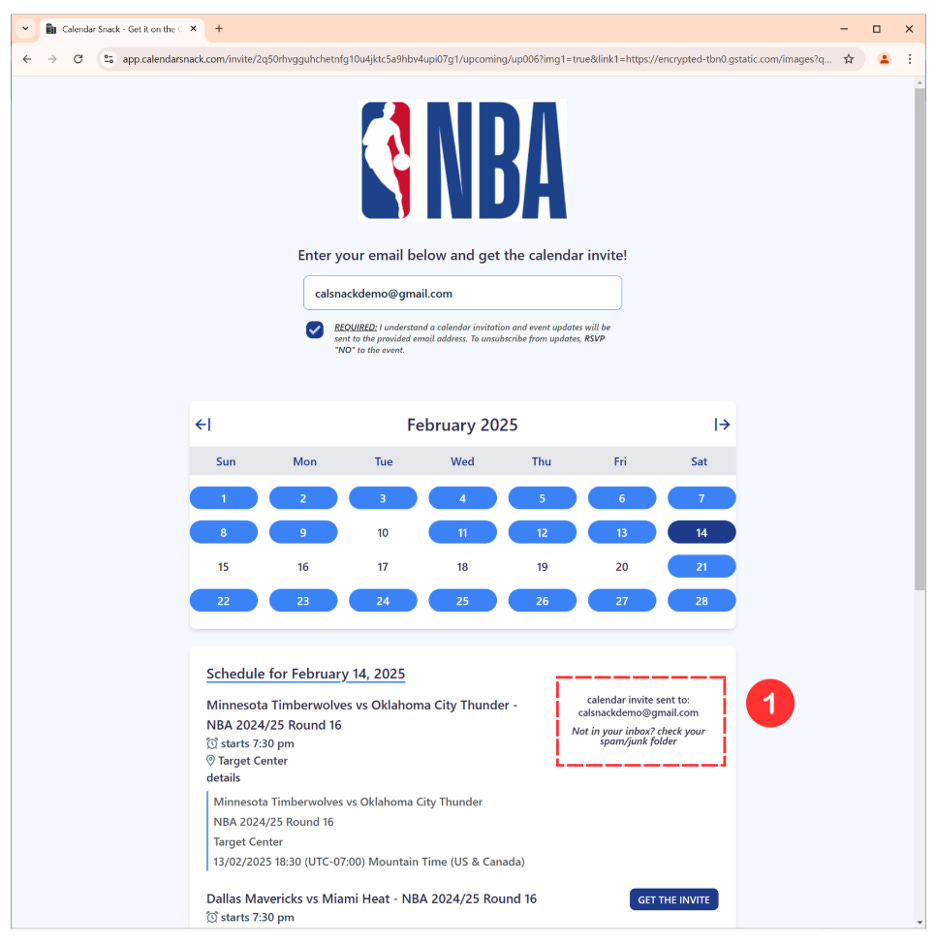
How the NBA Schedule was built example

Landing pages (along with email marketing) have become the "go-to" tools used by digital marketers.
The combination of these two tactics, in all their various forms, has provided digital marketing professionals with the ability to (a) find people with some level of interest in a product or service and (b) begin communicating with them.
The process:
• Use a webpage to explain something, and those people interested can enter their email address
• Use email marketing to continue "communicating" with them, allowing them to follow a path for more, increasingly detailed information
What did we do differently that no one else has done? Embedded the Calendar Invite into the Landing Pages.
Enter the Upcoming Landing Pages
The following is one of the Upcoming Events Landing Pages we designed, with a breakdown of what happens when someone visits the page.
You immediately see a logo at the top, the email input box, a "monthly" view of days, and, in this case, the games scheduled for the day selected. You can also navigate through the days to view games.
Page Breakdown – Design Meets Functionality
All the pre-built landing pages available through Calendar Snack use a combination of HTML, CSS, and Javascript – absolutely nothing complicated. To bring these elements together, we have standardized on the following:
• Vue JS as the framework for interactivity and functionality
• Tailwind CSS for styling
• Axios to interact with the Event(s) APIs
• Day JS for Date/Time display
Getting the Event Data
#1 - Getting the Data
We aren't going to spend time on the HTML framework; understand that Vue (like React, Svelte, or even JS) allows us to create an HTML template with styling to manage the visual display of the dynamic data.
But the question is: How do you get the Event (s) data?
The simple answer is through GET APIs. Those APIs request data for either a single Event or All Events for an Organizer. The data is a JSON Array; we can begin displaying it on the webpage.
Here's how we do it:
1. Using the URL as our starting point, we provide an EventID as the primary request for the Single Event API.
2. The JSON response includes an element for the Organizer's Email Address. We use this as the requestor to GET the complete listing of Events.
3. Now we have a standard JSON Array for our Upcoming Landing Page
4. Both are predefined GET APIs provided by CIS that can be modified to get data amounts.
5. We have also designed our GET APIs to require an API Key, which can be modified.
#2 - Filtering and Sorting Events
Once we have the Events JSON Array, we have another design decision: How can visitors find the Event they are interested in?
In this design, we provided a monthly calendar to filter a long list of events into "daily" events. This landing page doesn't have Event filtering from an "elimination" perspective (like search). Still, it does provide a simple method to select a single day to limit the number of events displayed.
1. After getting the complete list of Events, the JSON Array is presented in a "Last In, First Out" order. We sort that data into a logical "Now to Future" structure and eliminate past events.
2. Once the Events are re-sorted, we use filtering to display the events for a single "date" selected by clicking on a specific day within the month.
#3 - Displaying the Events
As mentioned above, the default view is the data for "today." The visitor can then scroll through the months and/or days to see the specific events for that date. The section below the month will display all the Events that match the DATE. You'll also notice that only days with Events can be "clicked. " The date selected is highlighted in both the Month display and as Headline Text within the display of individual Events.
To recap, when the Upcoming Landing Page is loaded, we:
1. Use the EventID to GET a single Event
2. Using that single Event, we grab the Organizer's Email Address to GET a list of ALL Events
3. After getting all Events data, we filter out Past Events
4. Re-sort the data array to "Now to Future" (I never can remember if that's ascending or descending order)
5. An additional filter is used to display individual Events
6. Default display is "today"
7. Navigation is provided to view Events daily
Getting the Email Address

Providing a simple text input box for user information is straightforward for those who have designed Landing Pages. It's no different on the Upcoming Landing Page. We need this input box and the associated "permission" checkbox to get the email address. We save that on the page to use later when we send the invite.
Text Box and Permission to Send
It's essential always to provide a level of trust within your landing pages; for our upcoming landing page, we have also provided a checkbox for permission to send in addition to a standard text input box.
Send the Invite Button
As you can see from the previous screen capture when the Upcoming Landing Page loads, the function (button) to Send the Invite is disabled. That is by design. The Send Invite button activates after the visitor has entered their email address AND checked the permission box.
The visitor can navigate the days displaying Events and click the Event button to receive an Invite. Only if they "refresh" the page does the Email and permission need re-entering.
You might ask yourself, "Can I also ask for additional information from the Invitee?"
It is possible. We can collect the NAME and the email address and associate them with the Invitee Record.
To go beyond Name/Email is beyond this overview, but it is possible. It is not a standard Invitee data capture element within CIS.
For Calendar Snack, we have taken the most straightforward approach: We ask for their email address only to eliminate as much friction at this point as possible.
Sending the Calendar Invite
At this point, the Upcoming Landing Page visitor has raised their hand and shown interest in at least one Event, but hopefully multiple Events. But what's happening behind the scenes when Sending the Invite to the Invitee?
Send Calendar Invite API
The functionality behind the button is a simple Send Invite API, with defined data passed through a GET to initiate the Invite Sending function. The following are data elements we use to help us track the Invitee beyond requesting and receiving the Calendar Invite.
Required Data
• EventID – this tells CIS which Event and Invite to send
• Invitee Email – email address to send the Calendar Invite
• Origin – a custom CIS field that provides "context" for where the Invitee requested the Invite
Optional Data
• Name – the name the Invitee wants to submit with their email address
• Landing Page – CIS uses the Send Invite API as a Hyperlink. CIS collects the Invitee data and then "redirects" the Invitee to another Landing Page or webpage.
We have designed our Single Event and Upcoming Landing Pages to use Javascript code rather than a Hyperlink and display a "success" method on the page without redirecting.
As mentioned above, once the page visitor clicks the button, we present a Success message, letting the Invitee know we have sent the Calendar Invite to their email address. The Invite is sent and delivered to their Email Inbox and Calendar simultaneously. CIS automatically creates an Invitee record for the Event.
Wrap-up
The overall design of the Upcoming Landing Page(s), provided through Calendar Snack, is opinionated in its design and functionality. We've chosen this approach to highlight what you can do, not everything you can do, with landing pages and sending calendar invites.
The data available to display either a Single Event or Multiple Events is robust enough for various designs, from highlighting a single Event to showing a filtered list of Events to providing all your events.
But by using a single input box for the email address and keeping it available within the browser, we allow the page visitor to "self-select" all the Events they're interested in without creating friction within the process. Calendar Invites are sent individually and immediately upon clicking a single button.
What could you do?
With CIS, the design of a landing page is limited only by your imagination. You can sort and filter from single Event to multi-event.
You control the Event display on the page through plain HTML, CSS, and JS.
Getting the data is controlled through GET APIs using standard tools like Axios and Fetch. Sending the Calendar Invite is simply inserting the required information (either through the API or as a Hyperlink), with CIS automatically sending the Invite and creating the Invitee data for the Event.
Calendar Snack is a fully functional Invite Sending Application with pre-designed and built landing pages for One-click Invite Sending. It is based on our Calendar Invite Server (CIS), which provides the event data and invite-sending functions to do it all.
The Calendar Invite Server API’s

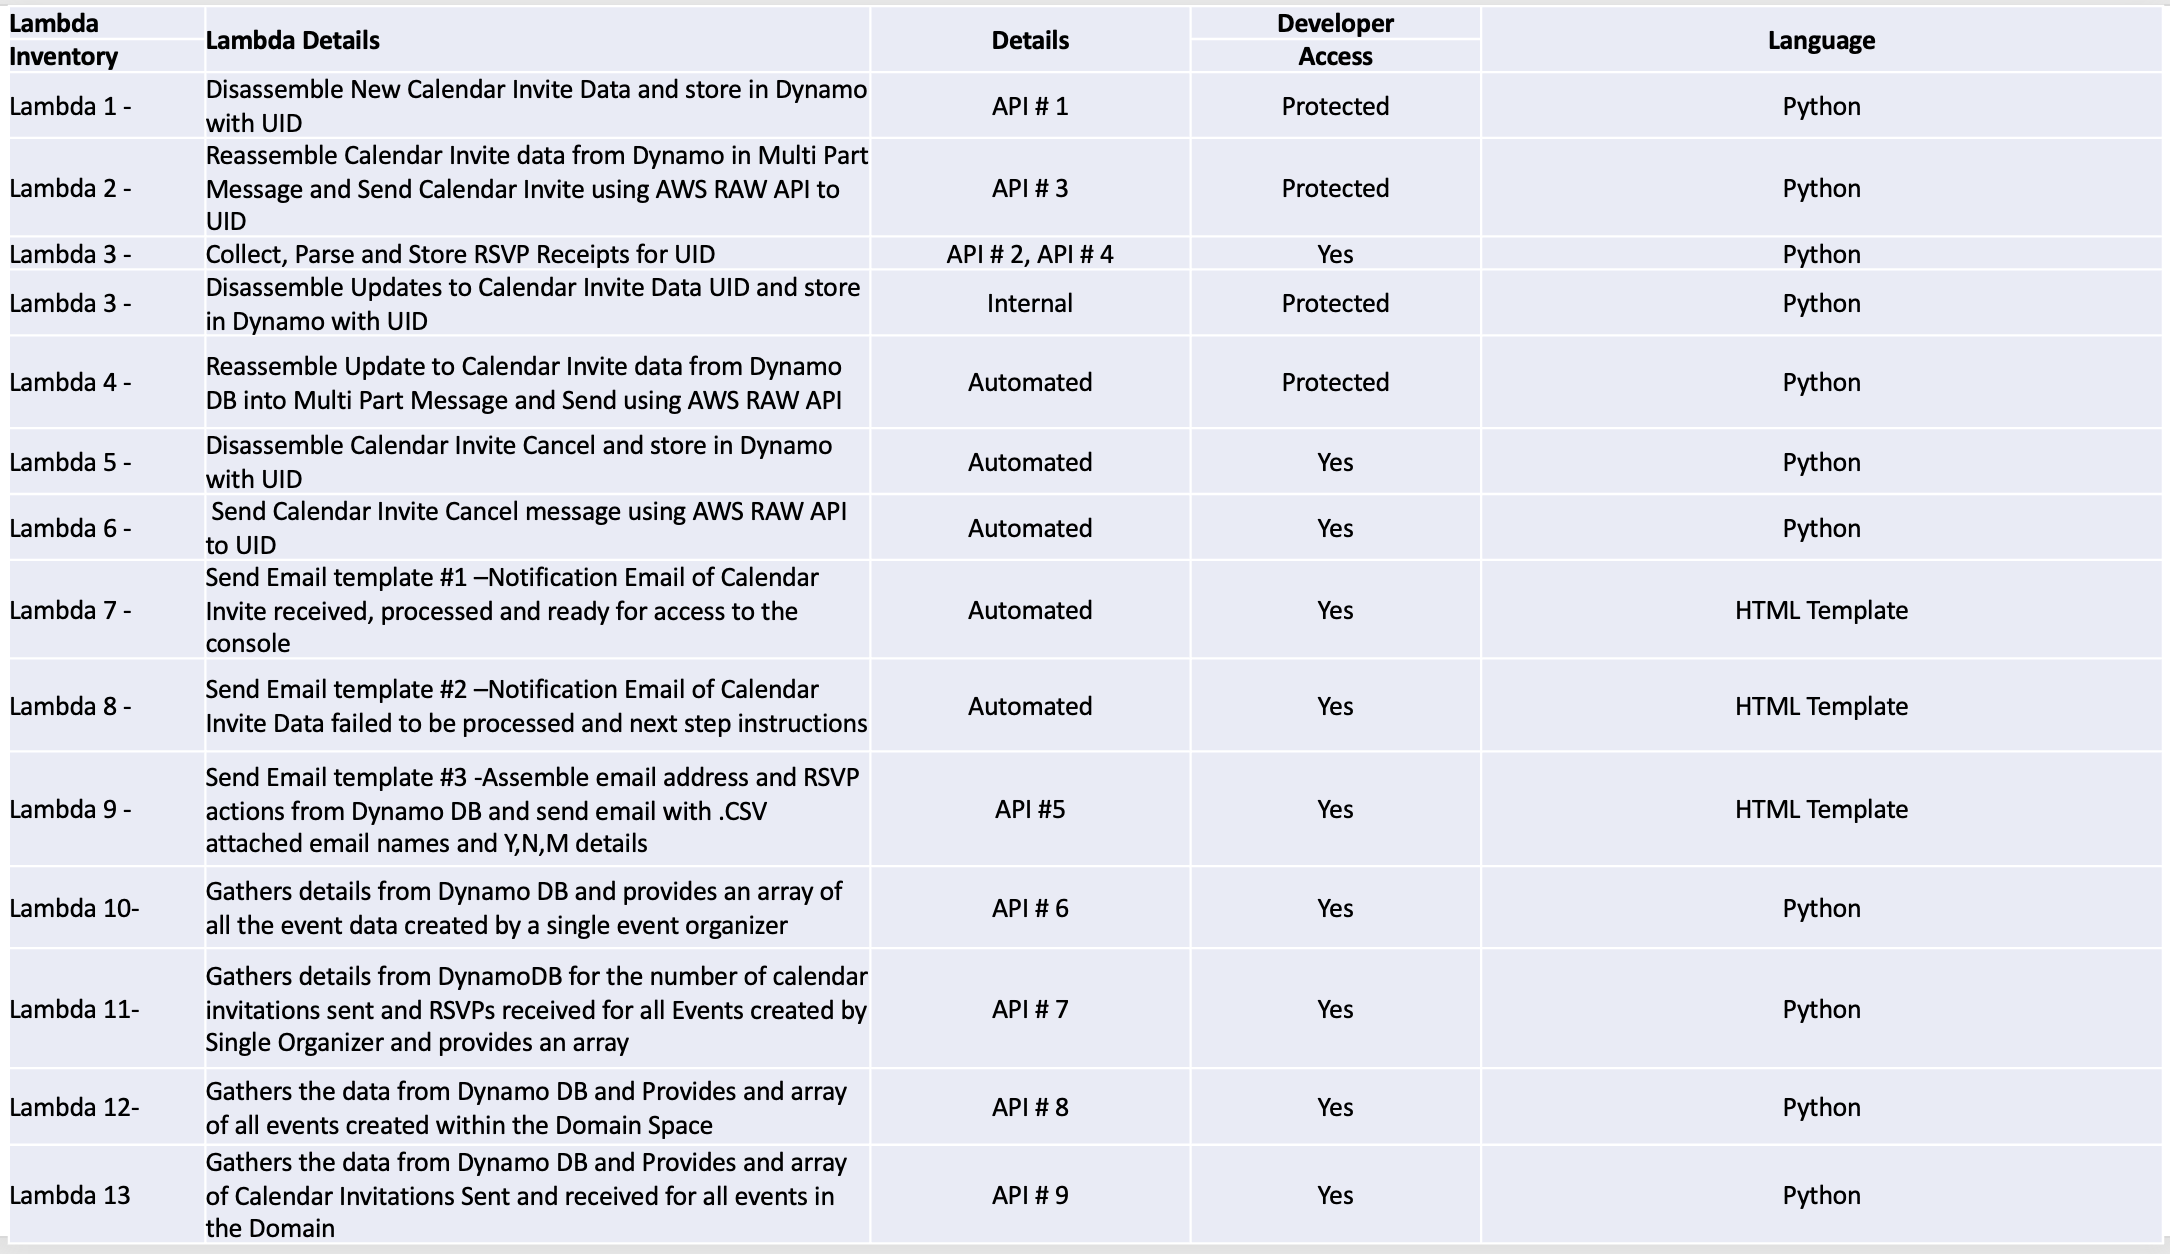
The Calendar Invite Server Lambda Kit
The API and Lambda Workflow for Upcoming Landing Pages

The AWS SAM Stack

Thanks for stopping by.
https://www.youtube.com/@calendarinvite/videos

 | A guest post by
|